It’s Not Easy Being Bleen: A Color-Changing Javascript Adventure
It may come as no surprise that our name, Grue & Bleen, is a play on the words Blue & Green. Swap “Gr” and the “Bl” and you’ve got us. It also refers to a linguistic and philosophical theory related to the Riddle of Induction, which states that something as fundamental as our perception of color could change dramatically in the future.
Technology & Perception
The colors we currently perceive as green and blue, then, can be more accurately called “grue” and “bleen”, somewhere in between the two that allows room for this eventual perceptual shift. Some historians even believe that ancient civilizations may not have been able to distinguish between the color green and blue, and it was only once we (the Egyptians) were able to manufacture the color that we made any distinction at all between the two. This is a great example of how deeply the technologies we create can change us, even on the most basic perceptual levels.

Let’s Experiment with Javascript Color Manipulation
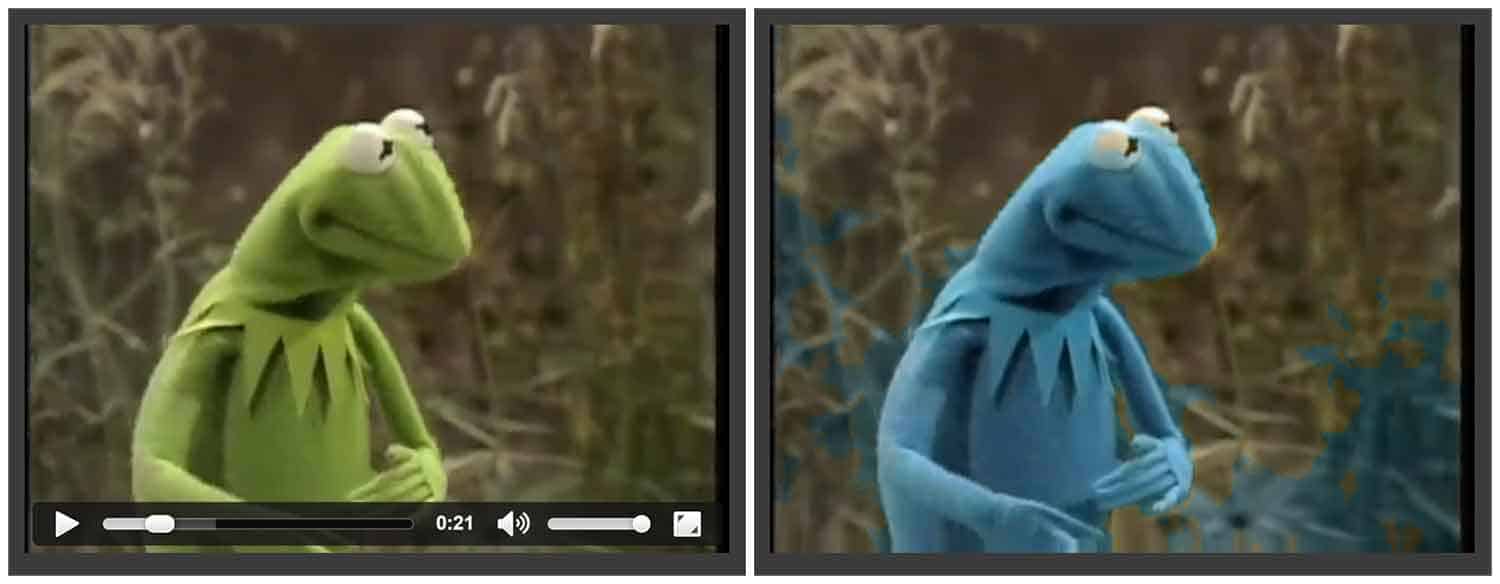
Let’s make a perceptual leap ourselves! What if we woke up and everything green was blue? Let’s dive into some simple video color manipulation using Javascript to get a taste of the post-blue-green-shift world. We’re going to take a video our favorite amphibious singing puppet and make him blue!
A Brief Intro to HSL Color: Degrees Above the Rest
The HTML canvas object uses the (perhaps more familiar) RGB system to manipulate color, but for our purposes, HSL color will be more useful. HSL stands for hue, saturation, and luminosity. We want to select a range of hue, in our case green, and easily shift the hue in that range to another, without changing the saturation or luminosity. HSL works on a degree sale, from 0 to 360, so it will make this shift easy.
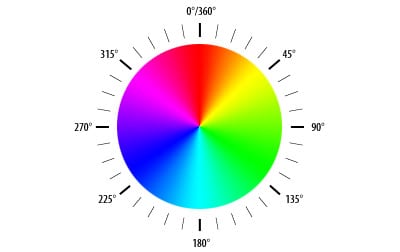
We’ll take colors in the green range (say, 55 degrees to 185 degrees), and add a set number of degrees to shift it into the blue range (around 185 to 270 degrees). This is not an exact science, but will be fine for our purposes.
The Markup
This is the code that will sit in a file called ‘index.html’. It consists of a video and two canvases. When the video plays, it will be copied frame by frame to the first canvas, and then we will manipulate the output onto the second canvas. We’ll hide the first canvas, since it’s really only there as an intermediate step between the video and our altered copy.
<!DOCTYPE html PUBLIC “-//W3C//DTD XHTML 1.0 Transitional//EN” “http://www.w3.org/TR/xhtml1/DTD/xhtml1-transitional.dtd”>
<html >
<head>
<meta http-equiv=”content-type” content=”text/html; charset=UTF-8″ />
<style>
div {
float: left;
border: 1px solid #444444;
padding: 10px;
margin: 10px;
background: #3B3B3B;
}
</style>
<script type=”text/javascript” src=”main.js”></script>
</head>
<body onload=”processor.doLoad()”>
<div>
<video id=”video” src=”kermit.mp4″ controls=”true” width=”480″ height=”360″ type=”video/mp4″></video>
</div>
<div>
<canvas id=”c1″ width=”480″ height=”360″ style=”display:none;”></canvas>
<canvas id=”c2″ width=”480″ height=”360″></canvas>
</div>
</body>
</html>
The Code
In the javascript, we’ll grab each frame from the video, and manipulate the color to our heart’s content, frame by frame and pixel by pixel. Explanation follows.
var processor = {
timerCallback: function() {
if (this.video.paused || this.video.ended) {
return;
}
this.computeFrame();
var self = this;
setTimeout(function () {
self.timerCallback();
}, 0);
},
doLoad: function() {
this.video = document.getElementById(“video”);
this.c1 = document.getElementById(“c1”);
this.ctx1 = this.c1.getContext(“2d”);
this.c2 = document.getElementById(“c2”);
this.ctx2 = this.c2.getContext(“2d”);
var self = this;
this.video.addEventListener(“play”, function() {
self.width = self.video.videoWidth;
self.height = self.video.videoHeight;
self.timerCallback();
}, false);
},
computeFrame: function() {
this.ctx1.drawImage(this.video, 0, 0, this.width, this.height);
var frame = this.ctx1.getImageData(0, 0, this.width, this.height);
var l = frame.data.length / 4;
for (var i = 0; i < l; i++) {
var r = frame.data[i * 4 + 0];
var g = frame.data[i * 4 + 1];
var b = frame.data[i * 4 + 2];
var hsl=this.rgbToHsl(r,g,b);
var hue=hsl.h*360;
// green to blue
if (hue > 55 && hue < 185){
var newRgb=this.hslToRgb(hsl.h+.35,hsl.s,hsl.l);
frame.data[i * 4 + 0] = newRgb.r;
frame.data[i * 4 + 1] = newRgb.g;
frame.data[i * 4 + 2] = newRgb.b;
frame.data[i * 4 + 3] = 255;
}
// blue to green
if (hue >= 185 && hue < 270){
var newRgb=this.hslToRgb(hsl.h-.25,hsl.s,hsl.l);
frame.data[i * 4 + 0] = newRgb.r;
frame.data[i * 4 + 1] = newRgb.g;
frame.data[i * 4 + 2] = newRgb.b;
frame.data[i * 4 + 3] = 255;
}
}
this.ctx2.putImageData(frame, 0, 0);
return;
},
////////////////////////
// Helper functions
//
rgbToHsl: function(r, g, b){
r /= 255, g /= 255, b /= 255;
var max = Math.max(r, g, b), min = Math.min(r, g, b);
var h, s, l = (max + min) / 2;
if(max == min){
h = s = 0; // achromatic
}else{
var d = max – min;
s = l > 0.5 ? d / (2 – max – min) : d / (max + min);
switch(max){
case r: h = (g – b) / d + (g < b ? 6 : 0); break;
case g: h = (b – r) / d + 2; break;
case b: h = (r – g) / d + 4; break;
}
h /= 6;
}
return({ h:h, s:s, l:l });
},
hslToRgb: function(h, s, l){
var r, g, b;
if(s == 0){
r = g = b = l; // achromatic
}else{
function hue2rgb(p, q, t){
if(t < 0) t += 1;
if(t > 1) t -= 1;
if(t < 1/6) return p + (q – p) * 6 * t;
if(t < 1/2) return q;
if(t < 2/3) return p + (q – p) * (2/3 – t) * 6;
return p;
}
var q = l < 0.5 ? l * (1 + s) : l + s – l * s;
var p = 2 * l – q;
r = hue2rgb(p, q, h + 1/3);
g = hue2rgb(p, q, h);
b = hue2rgb(p, q, h – 1/3);
}
return({
r:Math.round(r * 255),
g:Math.round(g * 255),
b:Math.round(b * 255),
});
}
};
The Explanation
We have just a few functions we’re working with:
doLoad
This function does all of our setup. It gets a reference to the video and the first and second canvas, along with their contexts. It then adds an event listener to the video, so that when it plays it calls timerPlayback to begin processing the frames.
timerCallback
If the video is paused or stopped, return. Otherwise, call computeFrame then recursively call timerCallback to continue processing frames.
computeFrame
This is where most of the magic happens.
- We draw the current frame onto the first canvas
- Then we grab the image data from the first canvas, for us to play with
- Then we loop through every pixel in that frame, one by one
- We get the r, g, and b channels of the current pixel, and then use a helper function to convert the rgb value to an HSL value
- If the value is in the green range (between 55 and 185), we add .35 to the value to bump it into the blue range
- If it’s in the blue range, we subtract .25 to lower it into the green range
- Then, we push the altered image data onto the second canvas
rgbToHsl & hslToRgb
These are helper functions to convert between RGB and HSL.
See it in action!
Right here: It’s not easy being Bleen! Eventually, we want to make an augmented reality app that flips your color perception. Stay tuned for that!

About Great Big Digital
Achieve your website goals with customized data, intuitive UX, and intentional design.

