How To Set Up Google Analytics in Google Tag Manager

When you first take a look at Google Tag Manager, as someone who is purely involved in marketing, it can be quite overwhelming and code-heavy. I always like to say that Google Tag Manager falls in this awkward place that is a little too techy for the marketers, and a little too marketing for the techies. GTM, however, is getting more and more essential and powerful as website technology increases. Tracking is important, every analyst desires to know what people are doing on their website and why. Google Tag Manager opens up a world of possibilities when integrated with programs like Google Analytics and Adwords and helps send the detailed information to these programs without having to be an expert coder or even having direct access to the source code of the website.
While GTM opens a vast world of possibilities and is literally a catalyst for millions of site-wide options that you can implement, it is important to know how to set up a few basics. In this article we will walk through how to implement Google Analytics through Google Tag Manager from scratch.
Putting your Google Tag Manager code on your website
This is the one bit of code that you will need to mess around with on your actual website, but it is very important that this gets implemented correctly, so we will walk through the steps of how to put it in the right spot and best practices. When you set up Google Tag Manager, it will prompt you to create an account. Your account should be the name of your company (or yourself) and the top-level organizer label for the websites that you manage. After you create an account it will ask you to create your first “container.”
Create a Container
The Actual definition of a container is: a code snippet used in web development that removes the need for multiple data tracking codes being placed directly on the site. Instead, one code is placed on every page on a site. In Layman’s terms Containers is your top-level organizational dashboard which will hold all of your tags, triggers and variables. Containers can be labeled as the actual website or you can give them a name to distinguish them from each other.
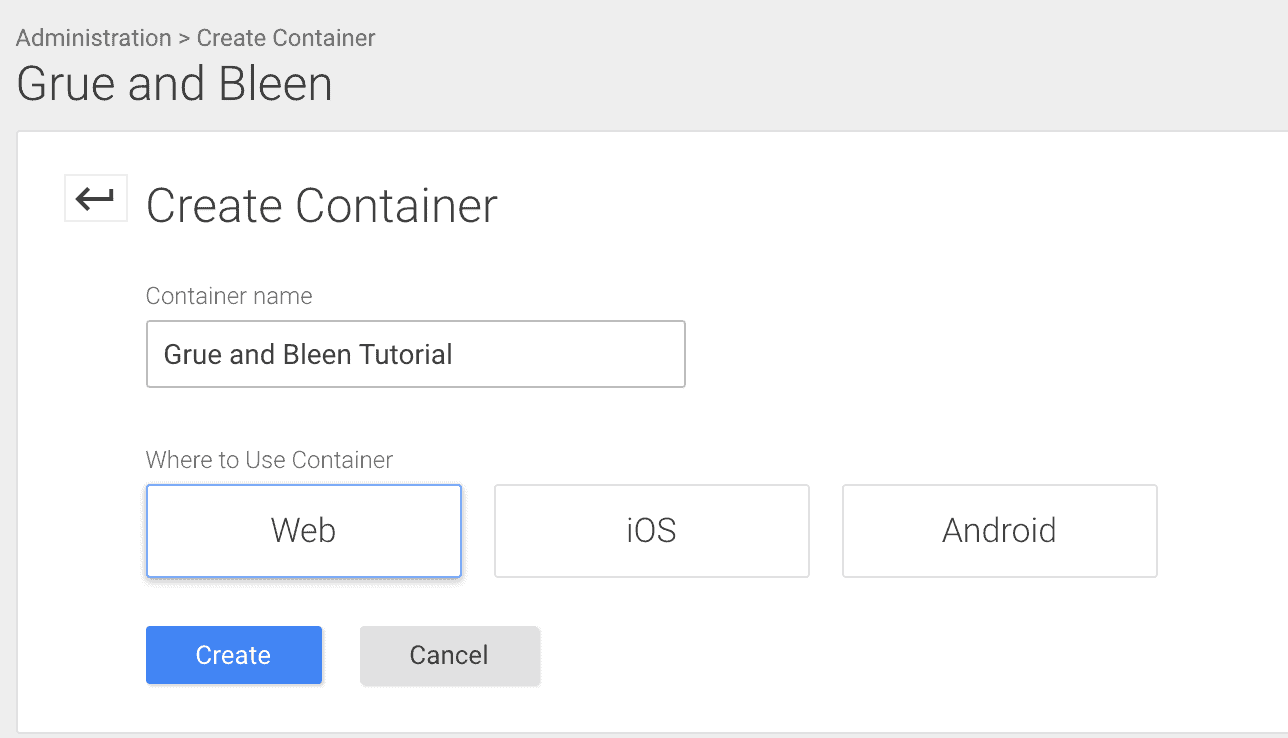
Once you’ve created your container, it will automatically go to the Tag Manager Interface with a pop up of some code to install. Maybe, if you’re lucky you will have a developer on staff to help you set this up. If you do, you can skip this section and proceed right to “How to Setup Google Analytics through Google Tag Manager.” Most likely however, you are now going to have to jump right into the scary place that is the backend of your website.
Install the Google Tag Manager Tracking Code on your Website
For this tutorial, we will be concentrating on how to install this code on a wordpress site, however you can also go directly into the backend of your website (through your FTP) and the same best practices apply.
Copy the code they give you which should look like this:

Navigate into your WordPress site to the dashboard and hover over Appearance. Select Editor.
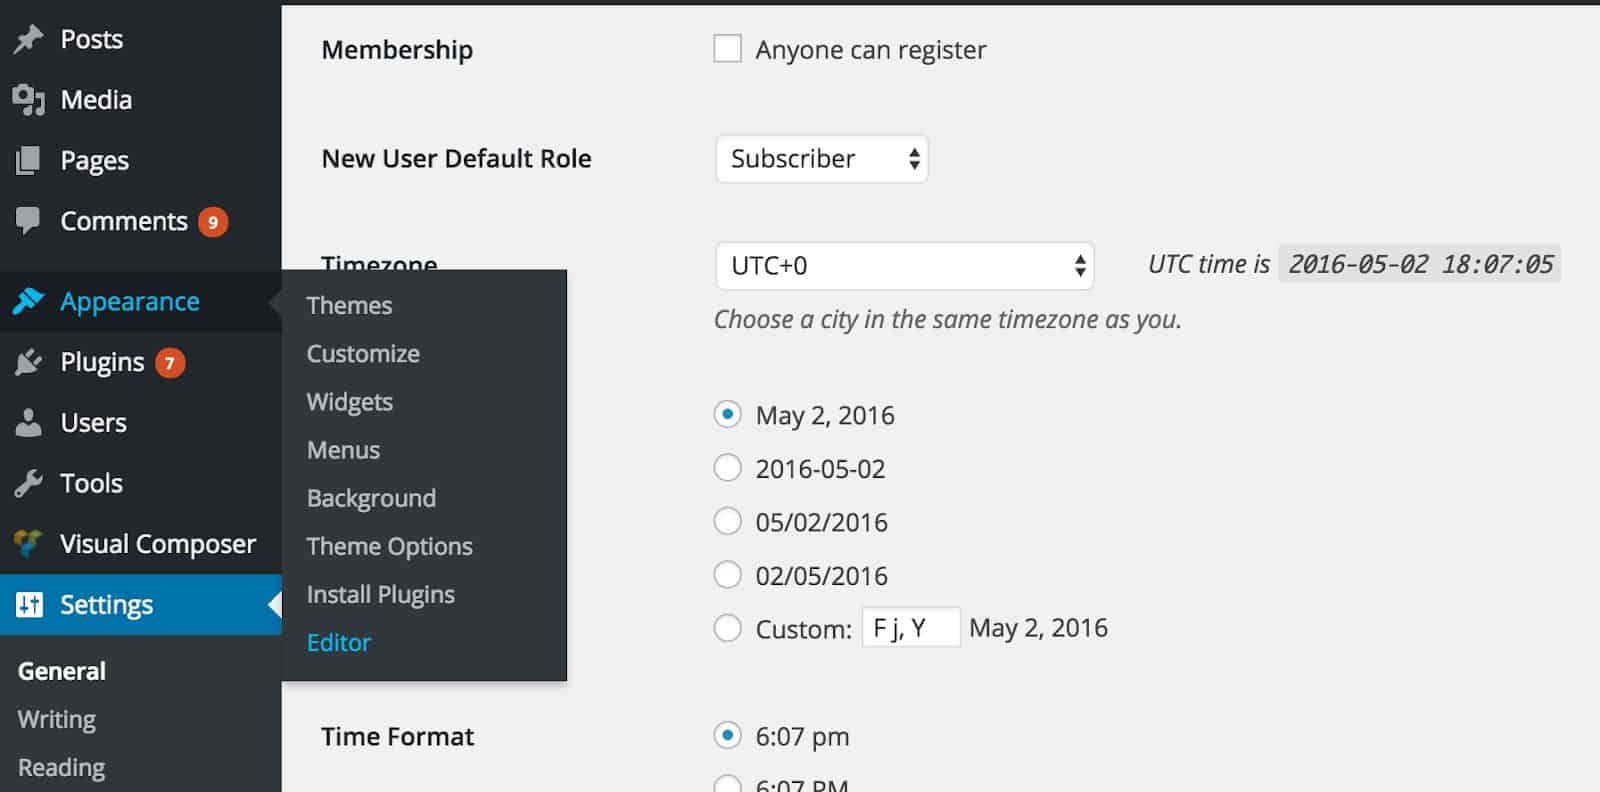
From there, find the header.php file.

Once selected, find the opening <body> tag and place the code that was provided, directly under that tag. It should look like this:
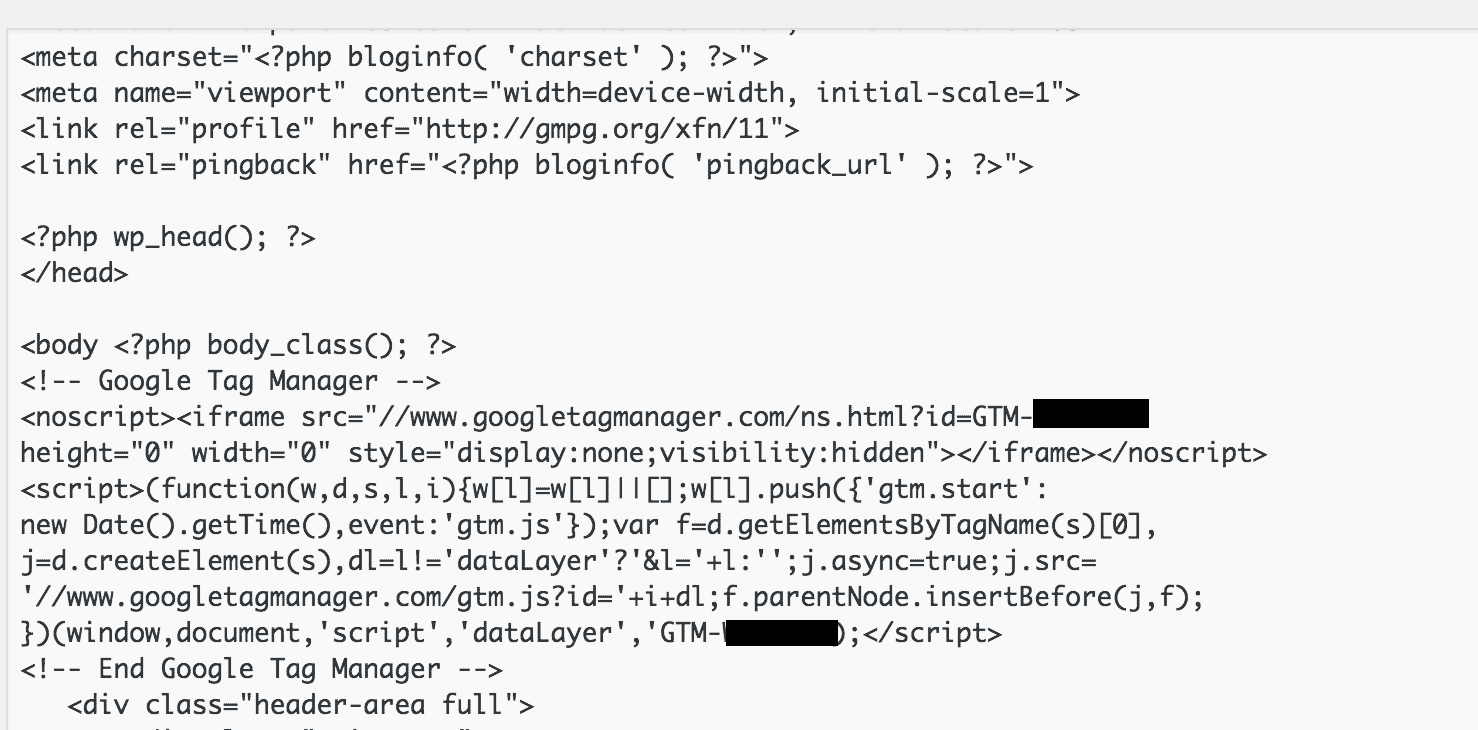
*Note: If you are not using wordpress, you are going to need to put this tracking code on every page on your website directly under the opening <body> tag. WordPress will automatically publish it on every page. I suggest you use a site like GAChecker to verify that Google Tag Manager, is on every page of your website.
Verify the GTM Tracking Code with Tag Assistant (by Google)
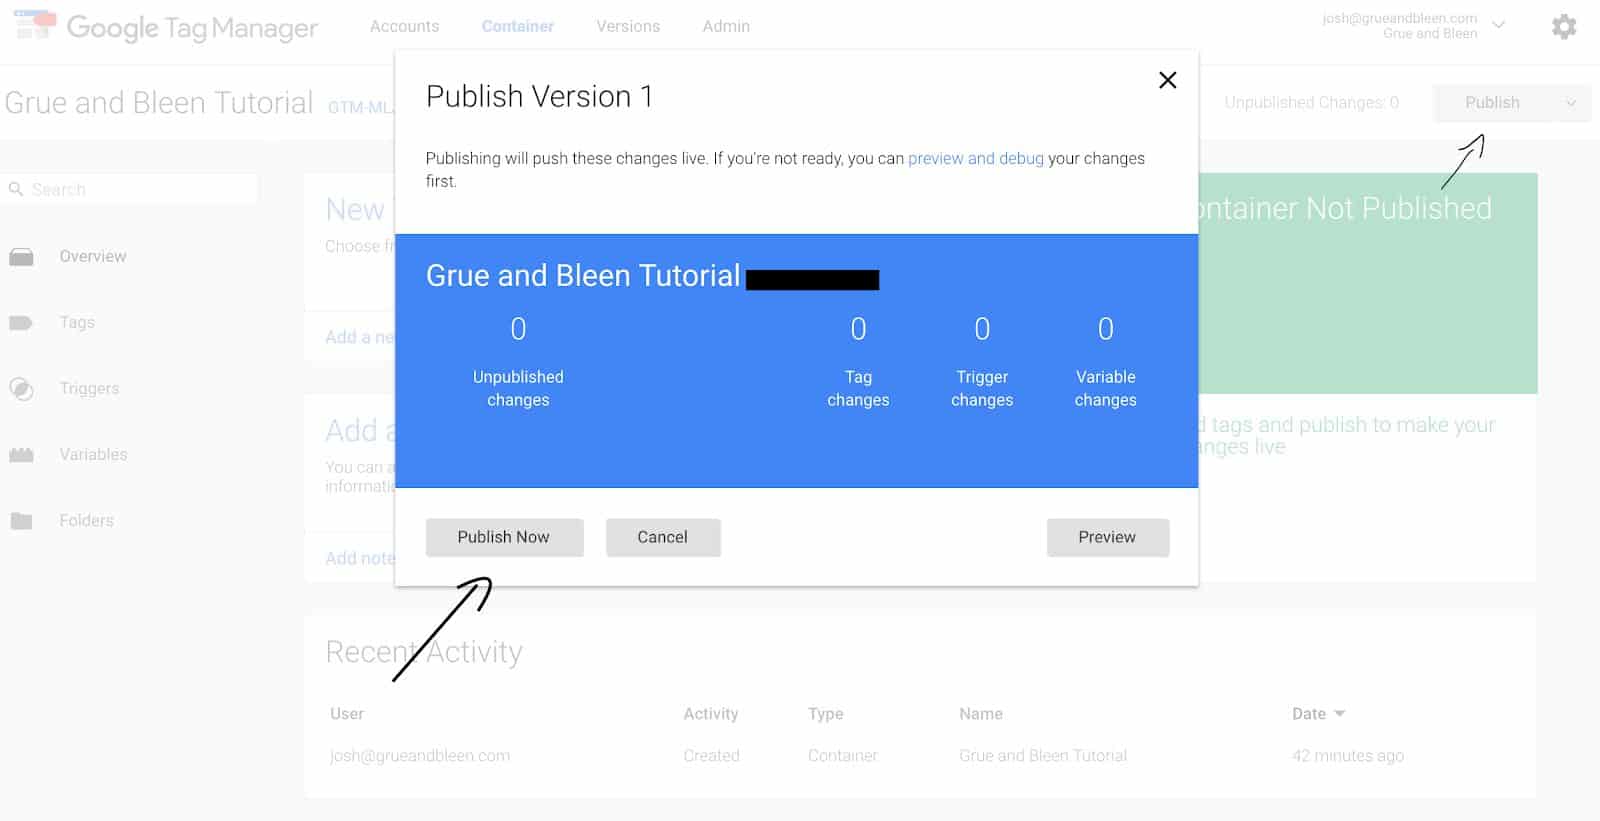
Once the tag is in the right place, navigate back to the Google Tag Manager Dashboard. There is a great chrome extension called Tag Assistant (by Google) that will help verify that GTM is on your site correctly. First however, you need to publish your changes.
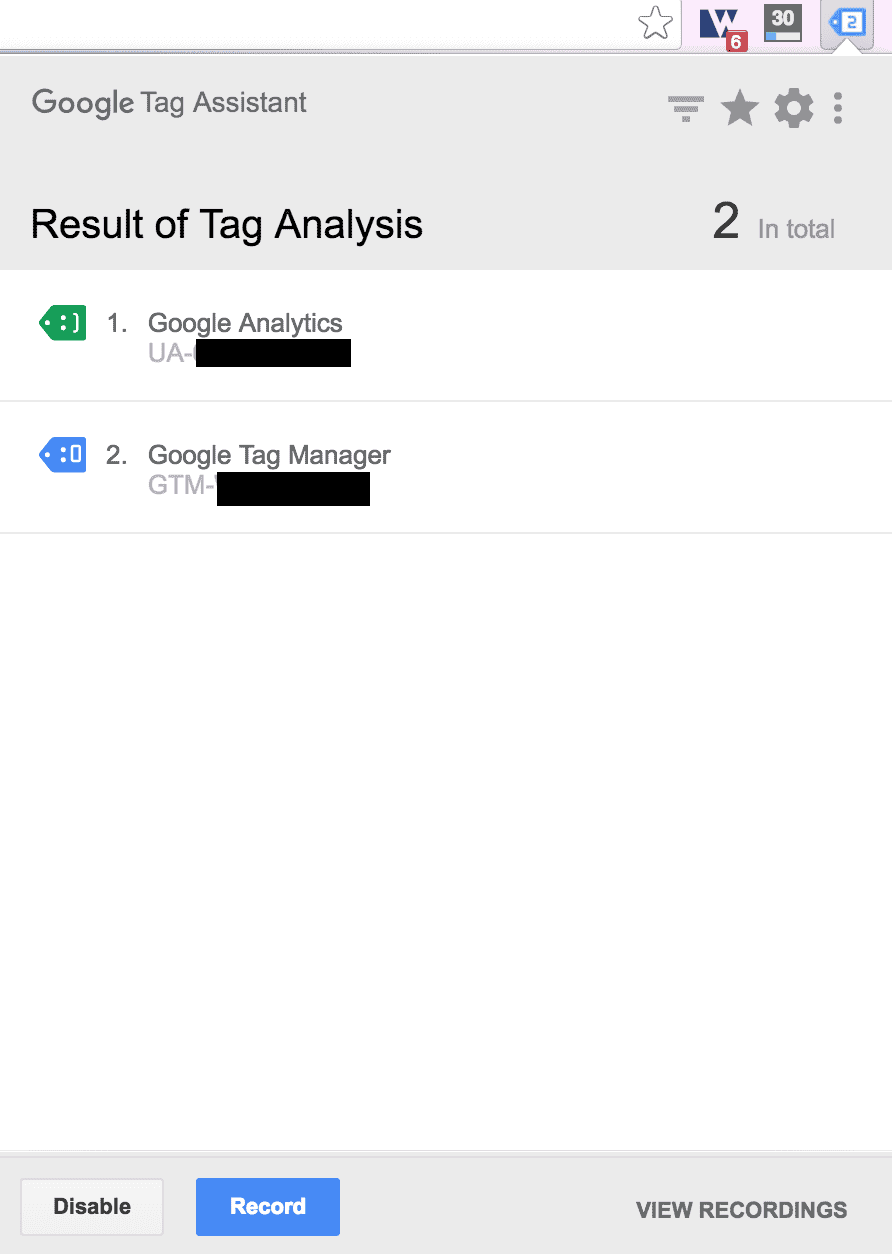
Download the chrome extension Tag Assistant (by Google), click on the chrome extension and click enable. Reload your page and you should see a blue/green tag that says “Google Tag Manager.” This means it was implemented correctly.
Excellent work! Now you are ready to start creating tags.
How to Setup Google Analytics through Google Tag Manager
Once you have Google Tag Manager implemented correctly, you can start creating tags. A great one to start with is Google Analytics. The benefits of running Google Analytics through Google Tag Manager doesn’t just have to do with organization: advance set-ups of GA through GTM can allow you to track almost any interaction you’d like to, from a click on a button to advanced scroll tracking. This is why an optimized setup of Google Analytics early will help streamline advanced tracking capabilities later. In this section, we will be reviewing how to push Google Analytics through Google Tag Manager and best practices.
Find Your Tracking Number
Navigate to your Google Analytics dashboard and select Admin. From there select the property view and find tracking info and tracking code
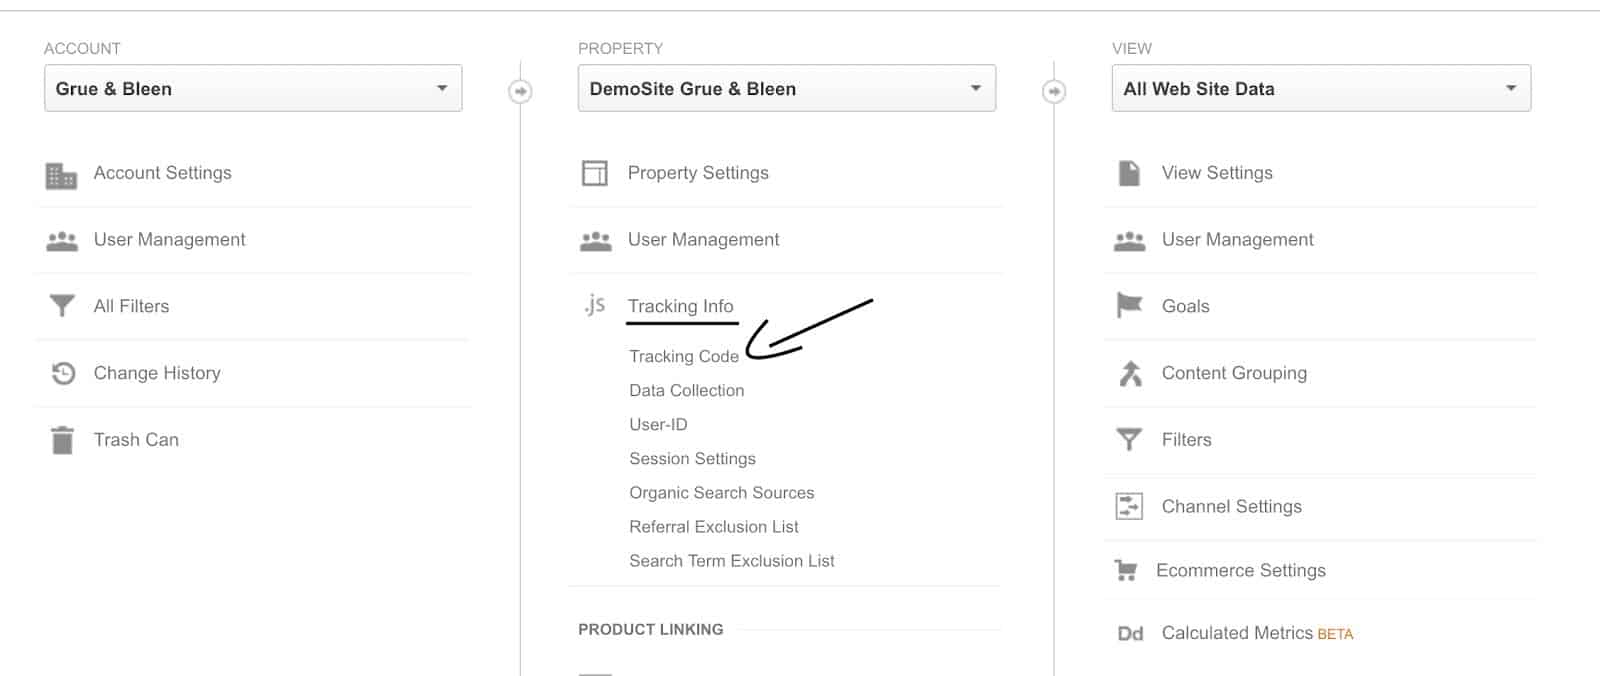

Your Tracking ID should look like this UA-XXXXXXXX-X. Copy this ID, this will become your first GTM Variable.
Create a Google Analytics Constant Variable
Navigate back to the GTM dashboard and select Variables.
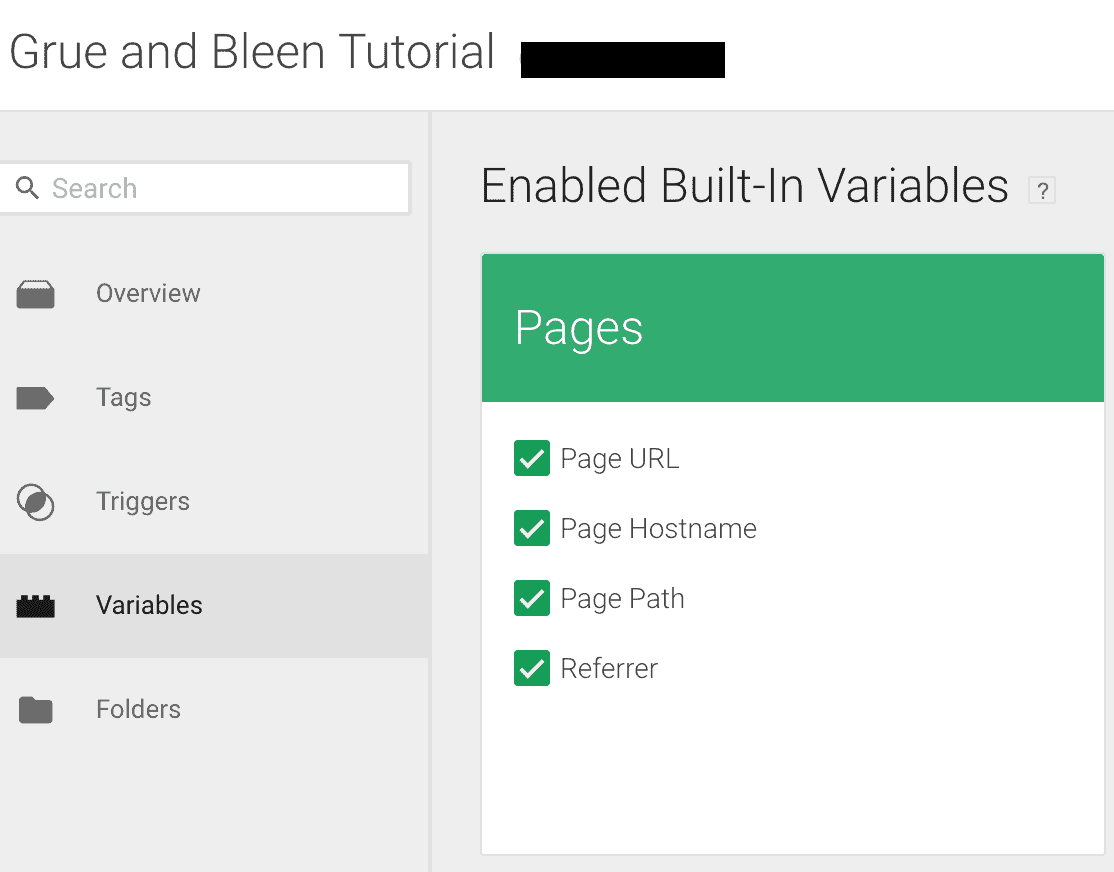
Scroll down to the bottom of the page and select New User-Defined Variable.

Name your Variable something easy to remember and categorize. Choose the “Constant” button and type in your Universal (Google) Analytics Tracking ID that you copied before. Finally, click “Create Variable.”
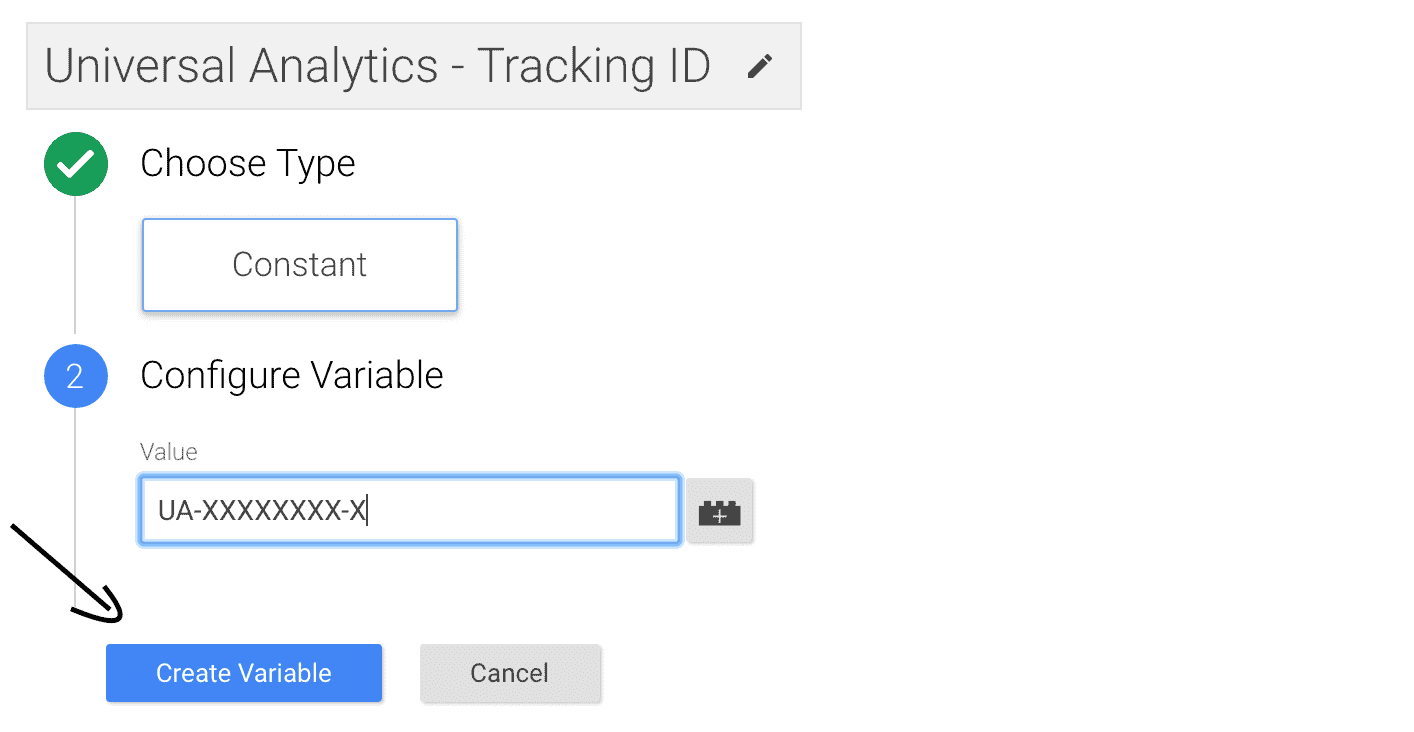
Creating your UA Tracking ID as a constant is not absolutely necessary; however, it will save tons of headache later and it’s better for organizing your variables, so this falls into the best practices category.
Create a Universal Analytics Tag
Now that you have your Universal Analytics – Tracking ID as a constant, we can create our first Tag. Navigate to the Tag section of your GTM dashboard and select New.

Name your tag something easy to remember and also something that distinguishes it from other Google Analytics tags that you might create down the road. My suggestion would be “Universal Analytics – Main” or “Google Analytics – Pageview.” Google Tag Manager provides a few tag interfaces to help you get started: Google Analytics is among the tag templates, so select the GA button.
The first option it gives you is to select between Universal Analytics and Classic Google Analytics. Most likely, if this is going on a new site and you’ve never had GA before, you are going to want to select Universal Analytics. The only time you’d select Google Analytics is if your site already uses old Google Analytics; however, Google has rumored that they will be removing this option from GTM moving forward. If you have a UA-XXXXXXXX-X Tracking ID, you are on Universal Analytics.
Now we need to configure the tag. Click the little lego piece next to Tracking ID. This lego piece represents your variables, and any new variable that has been created will show up in this dropdown. Find your tracking ID constant variable that you created and select it.
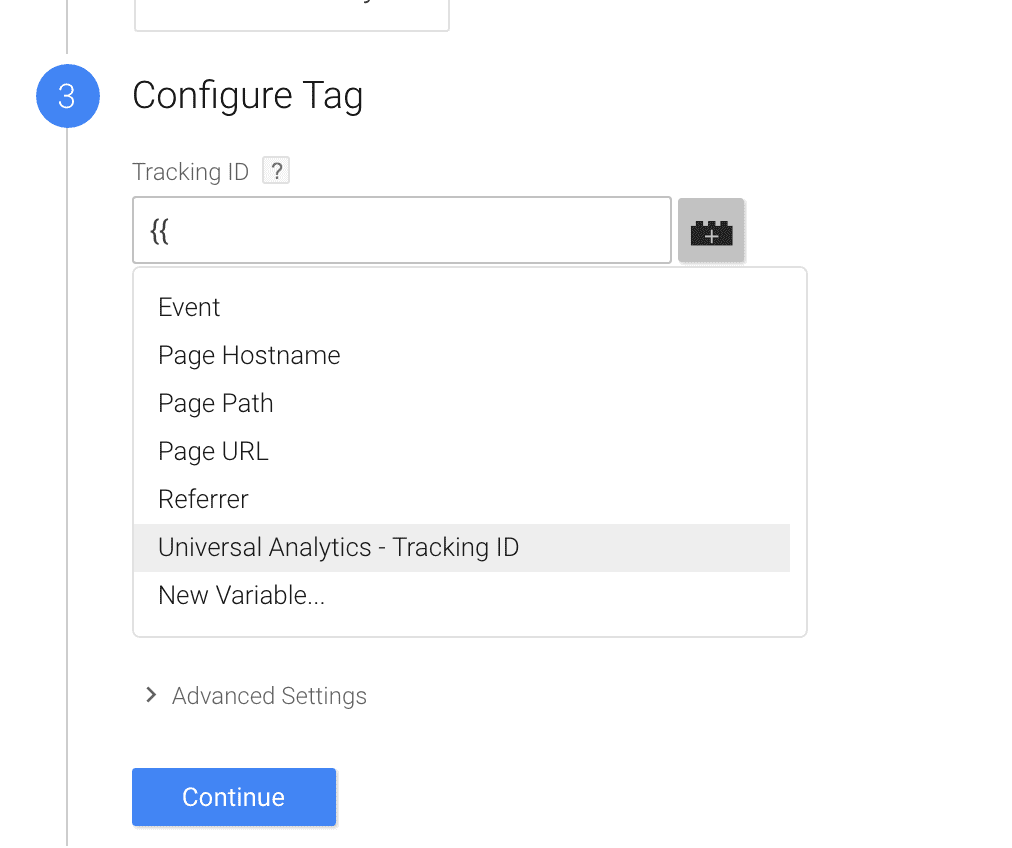
Now we can add a few custom features that will allow for some advanced and interesting data. After putting in the Tracking ID variable, select the little checkbox underneath called Enable Display Advertising Features. This will allow you to get demographic data in your Google Analytics reports.
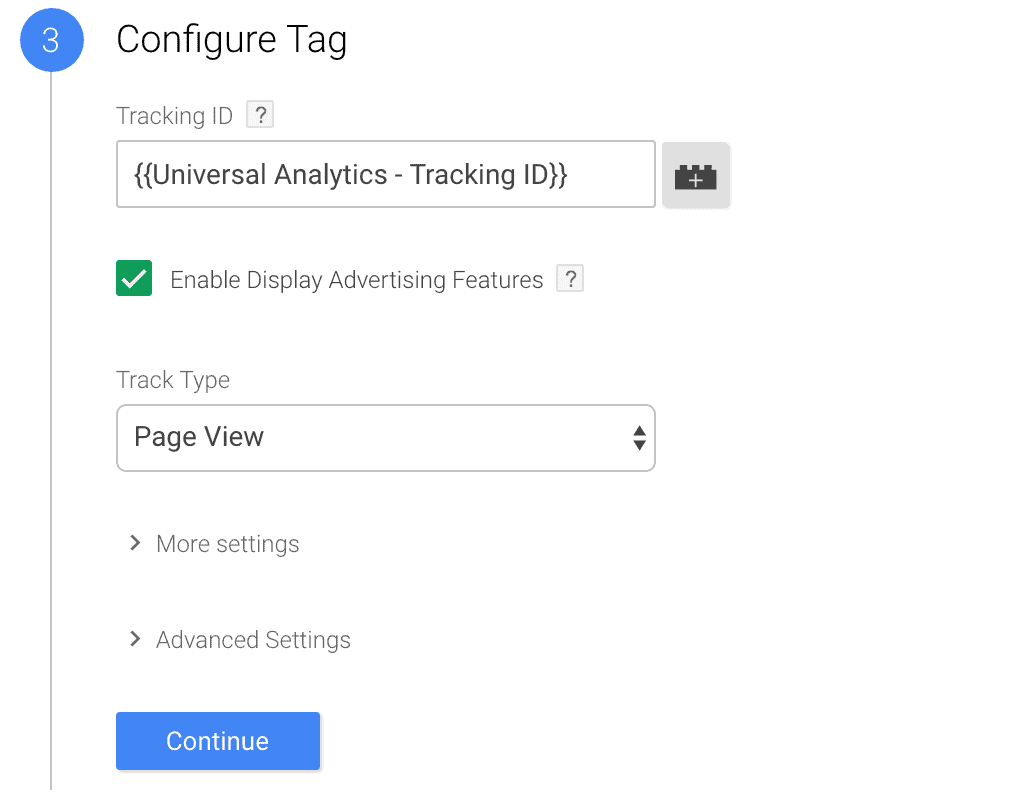
*note: You will still need to enable this feature in Google Analytics itself by going into your Property Setting under Tracking Info, selecting Data Collection and clicking on the button that is next to Advertising Features.
Click Continue and that will prompt you to pick a trigger for this. A trigger is essentially a list of rules that determine when your tag fires. Since, Google Analytics should be placed on every page of your site, select the Fire On “All Pages” trigger and then “Create Tag.”

You have now created your Google Analytics Tag! Note that nothing will fire though until you click Publish.
Preview/Debugging and Publishing your Tag
Before publishing your tag it’s best to use the preview and debugger or the Tag Assistant to make sure everything is firing properly.
Preview and Debug will become essential as you create more and more tags, however, for the sake of wrapping up this tutorial, we will assume that everything is input correctly and will click Publish. Feel free to comment below or contact us with questions on how to use the Preview and Debug mode.
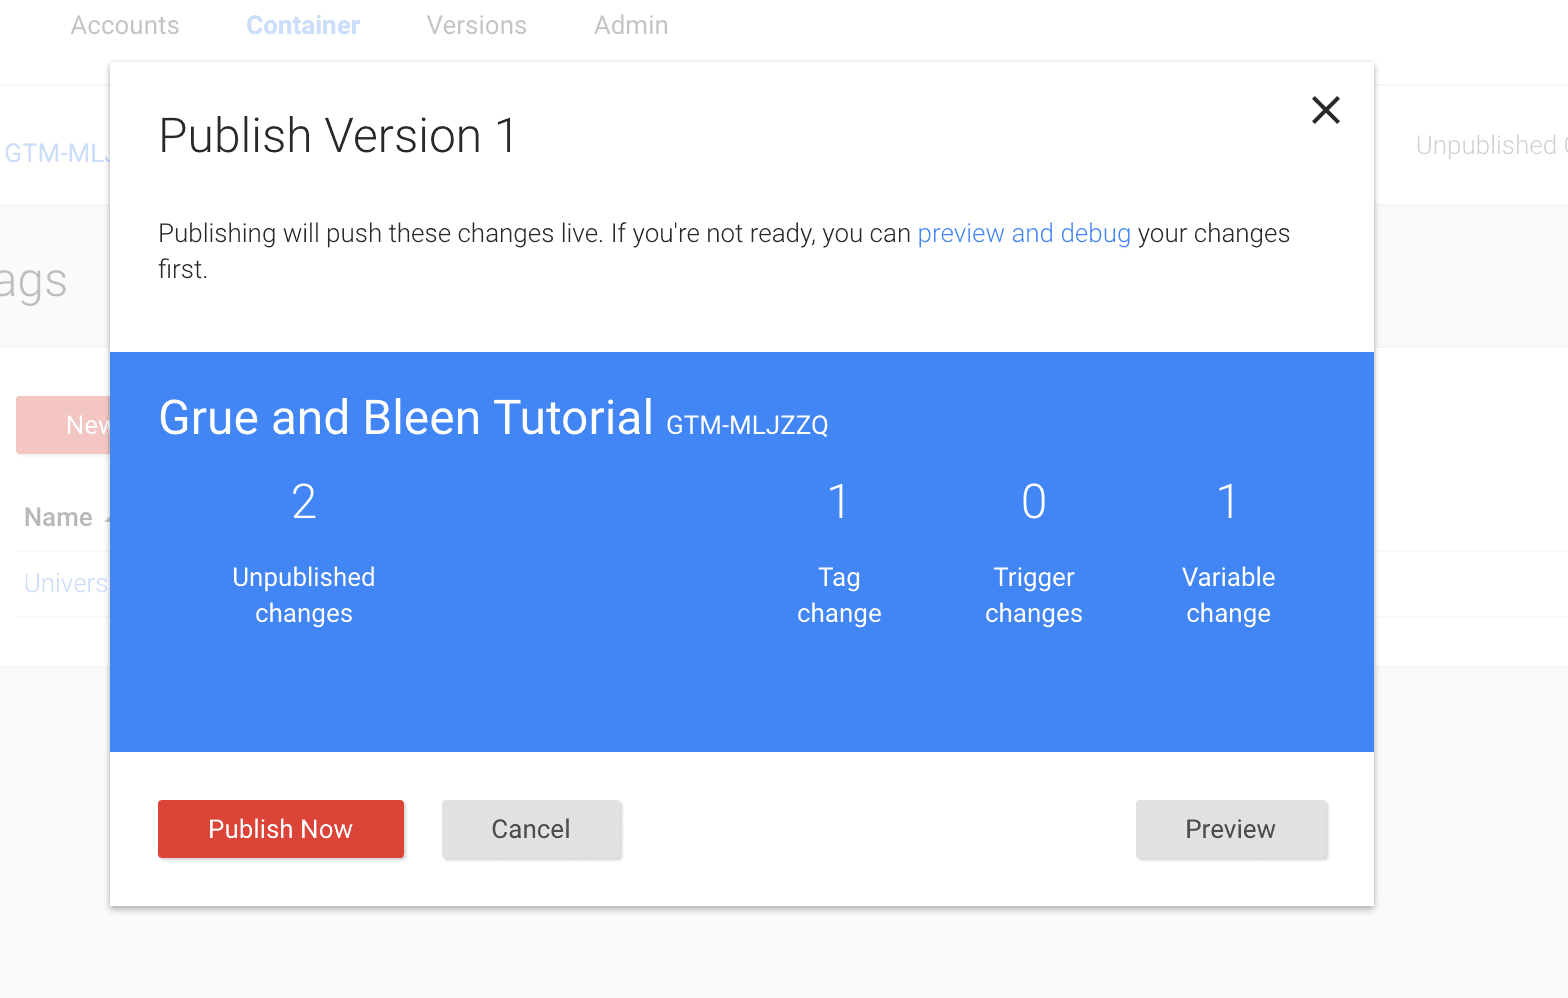
When you click Publish, it should look like this. After verifying that everything looks ok, click Publish Now.
Now if you enable Tag Assistant (by Google), you should see both, your GTM Tag and your Google Analytics tag in listed.
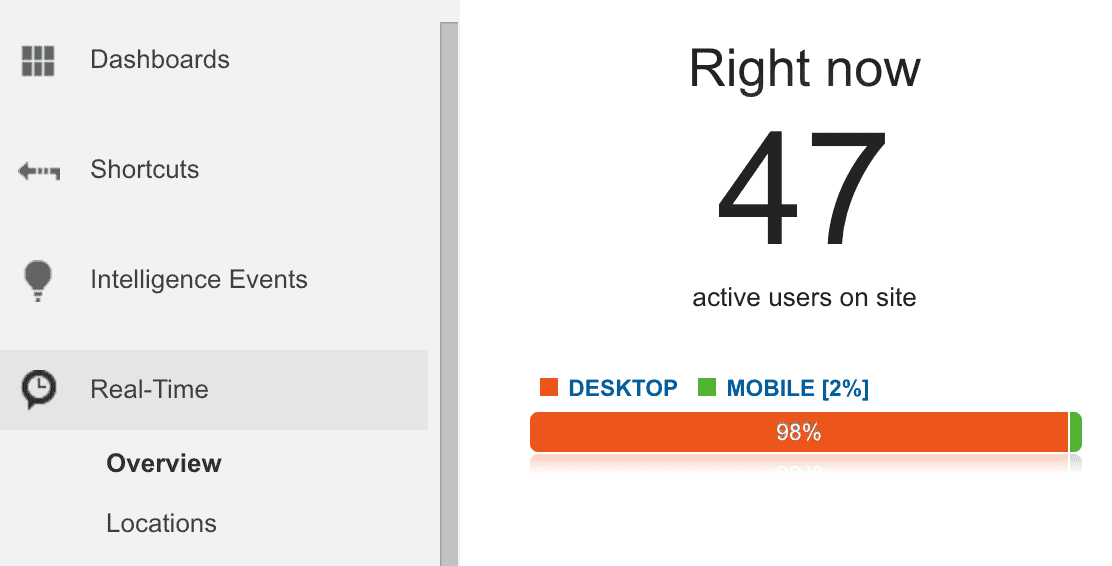
One more quick verification technique is very useful to make sure everything is in the right place. Go back into your Google Analytics interface and select Real Time. If you are currently on your site, you should see some at least 1 user. Jump around your site a bit to verify that it’s picking up traffic.
If everything looks good, you are done! You’ve implemented Google Analytics through Google Tag Manager. We are really just scratching the surface of what can be done with an advanced setup of Google Analytics through Google Tag Manager, but it’s a great start. Now go play around but careful: with great power comes great responsibility. Google Tag Manager can quickly break your website if you don’t know what you’re doing, so make sure you research hard, step carefully, and don’t be afraid to ask! Contact or comment with any questions you may have. Good Luck!
For more on Google Analytics best practices check out Top 10 Google Analytics Tips to Optimize Your Data

About Great Big Digital
Achieve your website goals with customized data, intuitive UX, and intentional design.


