How to Setup Node and Build a VUE App in Under 15 Minutes
A How-to Guide for Programmers of Any Skill Level
The world of web development is in a constant state of flux. Every year new technologies arise to expand on an already populous array of languages, frameworks, libraries and more. To the newly-initiated programmer, it can be very difficult to choose which path to take after your initial steps into HTML and CSS.
Maybe you know how to style and form your layout, you’ve learned some JavaScript to handle data input, but you don’t know which framework or library to move towards as you develop your skills. Although new ones have been rising to the forefront this past year, Angular, React, and Vue remain three of the most popular choices for web development in 2021, each with their own vibrant international community of contributors.
You may be wondering, which of these is superior? Well, none of them. Each has their own use-cases, and what resonates as a good work-flow and semantic structure for me may resonate poorly for you. Before striking on a definitive path, I highly recommend you dabble in each of them first. There’s no need to go hard and build a Twitter clone right away. Simply download each via NPM or yarn, create a generic template, and peruse the code. Get a feel for what makes the most sense for you.
You may now instead be wondering, okay so then where should I start? This question is much easier. I do not believe Vue is necessarily better than React or Angular, but I firmly believe that it is the easiest to start with. The code structure and methodology within a Vue file is much more similar to an HTML file than either of the framework’s counterparts, making the learning curve less steep by comparison. Additionally, given that Vue was designed with a primary focus on front-end, user-interface development (hence the name) with built-in animations for modern design (see: vuetransitions), it is a great way for newer developers to quickly elevate their CSS game.
You may now instead be wondering, okay so then where should I start? This question is much easier. I do not believe Vue is necessarily better than React or Angular, but I firmly believe that it is the easiest to start with. The code structure and methodology within a Vue file is much more similar to an HTML file than either of the framework’s counterparts, making the learning curve less steep by comparison. Additionally, given that Vue was designed with a primary focus on front-end, user-interface development (hence the name) with built-in animations for modern design (see: vue transitions), it is a great way for newer developers to quickly elevate their CSS game.
In this tutorial, we will go over the prerequisite technologies needed to develop with Vue, how to fire up a new Vue app, and some of the basics of what makes Vue unique.
We will need:
- a Code Editor (i.e.VS Code )
- Command-line interface (CLI)
- Node + NPM
- A basic understanding of JavaScript, HTML, and CSS
This tutorial was designed for people of all skill levels. Whether you have known JavaScript for years or only a few weeks, don’t be afraid to jump in!
Step 1: Setting Up Our Computer for Vue Development
Choosing a Code Editor
Before we get started, you will need a code editor that can read Vue files in addition to JavaScript, HTML, and CSS. You will also need a command-line interface to install Node and other packages. For Vue (and web programming in general), I highly recommend VS Code. It’s user-friendly and has a vibrant community of developers building open-source extensions and themes, making it one of the most versatile code editors out there today. But most importantly, VS Code has a built-in command-line interface.
If you already have a CLI that you prefer, that’s totally fine! But if you’re new to web development, I recommend keeping it simple – the VS Code terminal is versatile and can run a variety of different shells such as Powershell and Git Bash. You can find installation-directions for Mac and Windows here on their website.
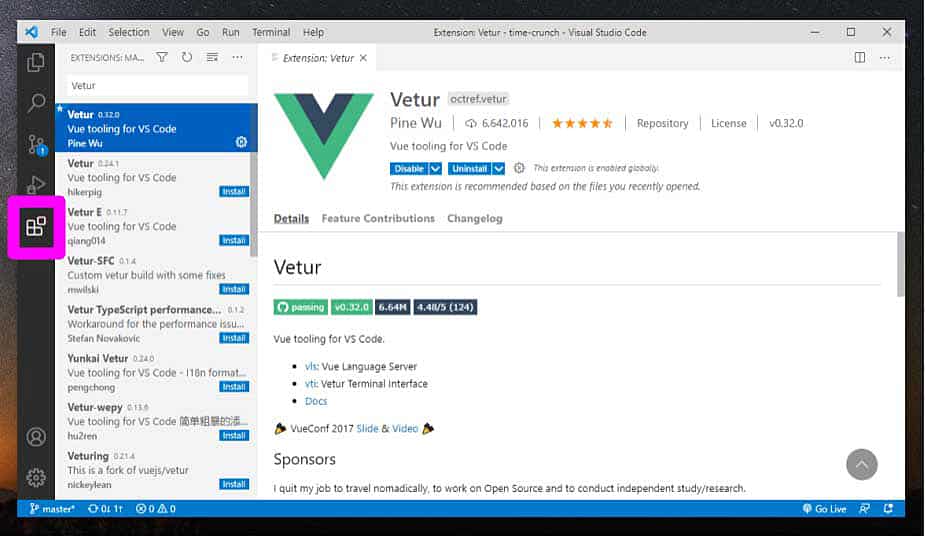
Once you have VS Code installed, open up the Extensions panel and search: ‘Vetur’. (In the image below, note the Extensions panel can be accessed through the fifth icon down on the left). Select Install. This will enable your VS Code editor to provide visual aide and suggestions when browsing a file with the .vue file extension.
Installing Node & NPM
The next thing we have to do is install Node and NPM. To put it simply, Node.js is JavaScript for the back-end. It’s not a language: it’s a run-time environment that enables JavaScript to run outside the browser. NPM stands for Node Package Manager. A package manager is a collection of software tools that enables you to install, upgrade, and delete files. This is the main tool we will use to create Vue apps.
Note: NPM is not the only way to install and manage node packages – Yarn is a popular alternative. However, to keep things simple for this tutorial, we will use NPM as it is the most common.
In the future, as you get deeper into Node, I advise you look into NVM (Node Version Manager). It enables you to switch between versions of Node depending on your software needs, and enables you to run upgrades. But to keep things easier for today, we’ll download the current recommended version via the Installer.
Check out the Node.js website here and download the current version for your OS. Bundled in this installation you will also get NPM. Once the installation is complete, open up the terminal in VS Code. Go to the navbar > Select ‘Terminal’ > ‘New Terminal’
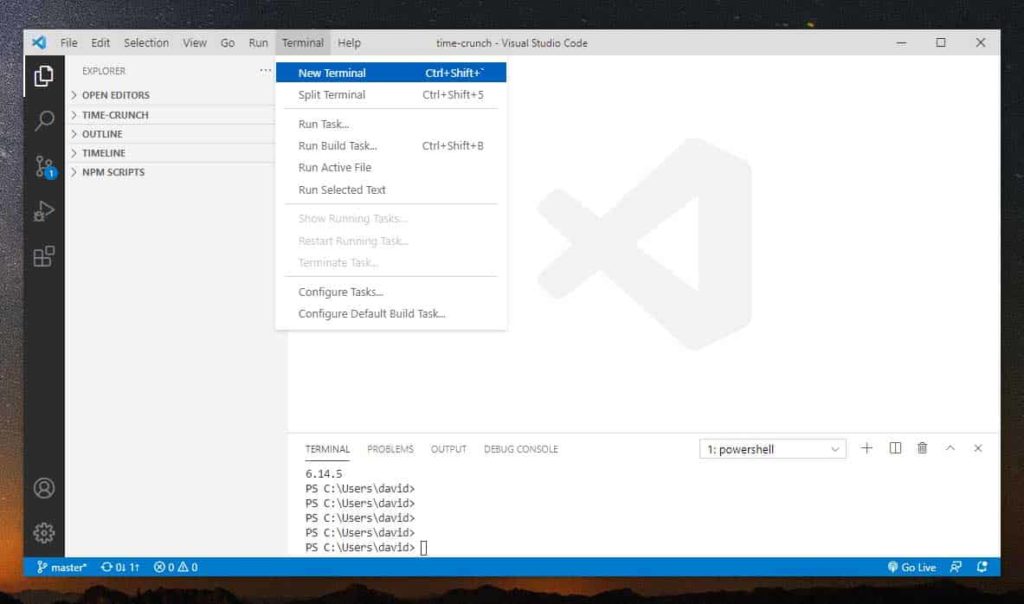
Now we can verify if Node and NPM were installed. Run the following scripts separately in the terminal – each will tell you what version you have installed, which in turn will confirm that the installation was successful.
 node --version

 npm --version
Step 2: Installing VUE and Creating Our First Application
Now that we have all of the pre-requisite technologies squared away, lets install the Vue CLI. Enter the following in the VS Code terminal:
npm install -g @vue/cliNavigate to the repository you would like to store your application in. You can navigate the terminal with the command: {cd}. To move down into the file tree, {cd} should be followed with the name of the directory you wish to explore (ex. {cd my-directory}). To move back up the file tree, enter {cd ../}. To create a directory, enter {mkdir} followed by the name you want to give your new folder (ex. {mkdir new-folder}). When you name your folder, avoid using spaces in the title. Note: depending on your terminal, these commands may not work. If you’re having issues, look up your terminal/shell alongside your OS.
Make sure your terminal is in the correct directory that you wish to build your app. (You can verify your location as it’s listed in the terminal next to your cursor.) Then enter the following scripts, one line at a time:
 mkdir vuepractice

 cd vuepractice
Now that we are in a safe place to build and store our app, enter the following terminal command:
vue create mynewdemo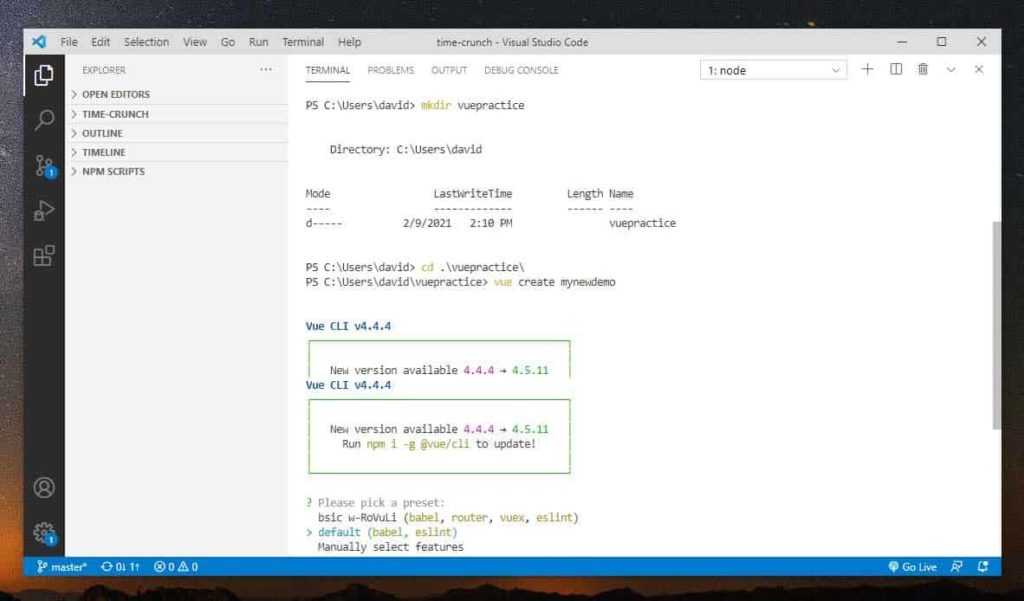
Upon doing so, you will be given a few options to customize your app. This is one of the advantages of using powershell – unlike some other terminals, it enables you to make selections via the spacebar and arrow keys. (If you’re using Git Bash for example, which can’t make selections, don’t fret – you can install any missing packages later). For now, let’s keep it simple: select default.
When the installation is complete, enter the following commands in the terminal (one at a time):
 cd mynewdemo

 npm run serve
Once the app is running, the terminal will display the following message: DONE Compiled successfully in ###ms. It will also tell you on what localhost your app can be found, most likely: localhost:8080. Put that url in your preferred browser (not Internet Explorer) and you should see something similar to this:

Congratulations! You just made your first Vue application!
Step 3: Migrating a Simple Static Application to Vue
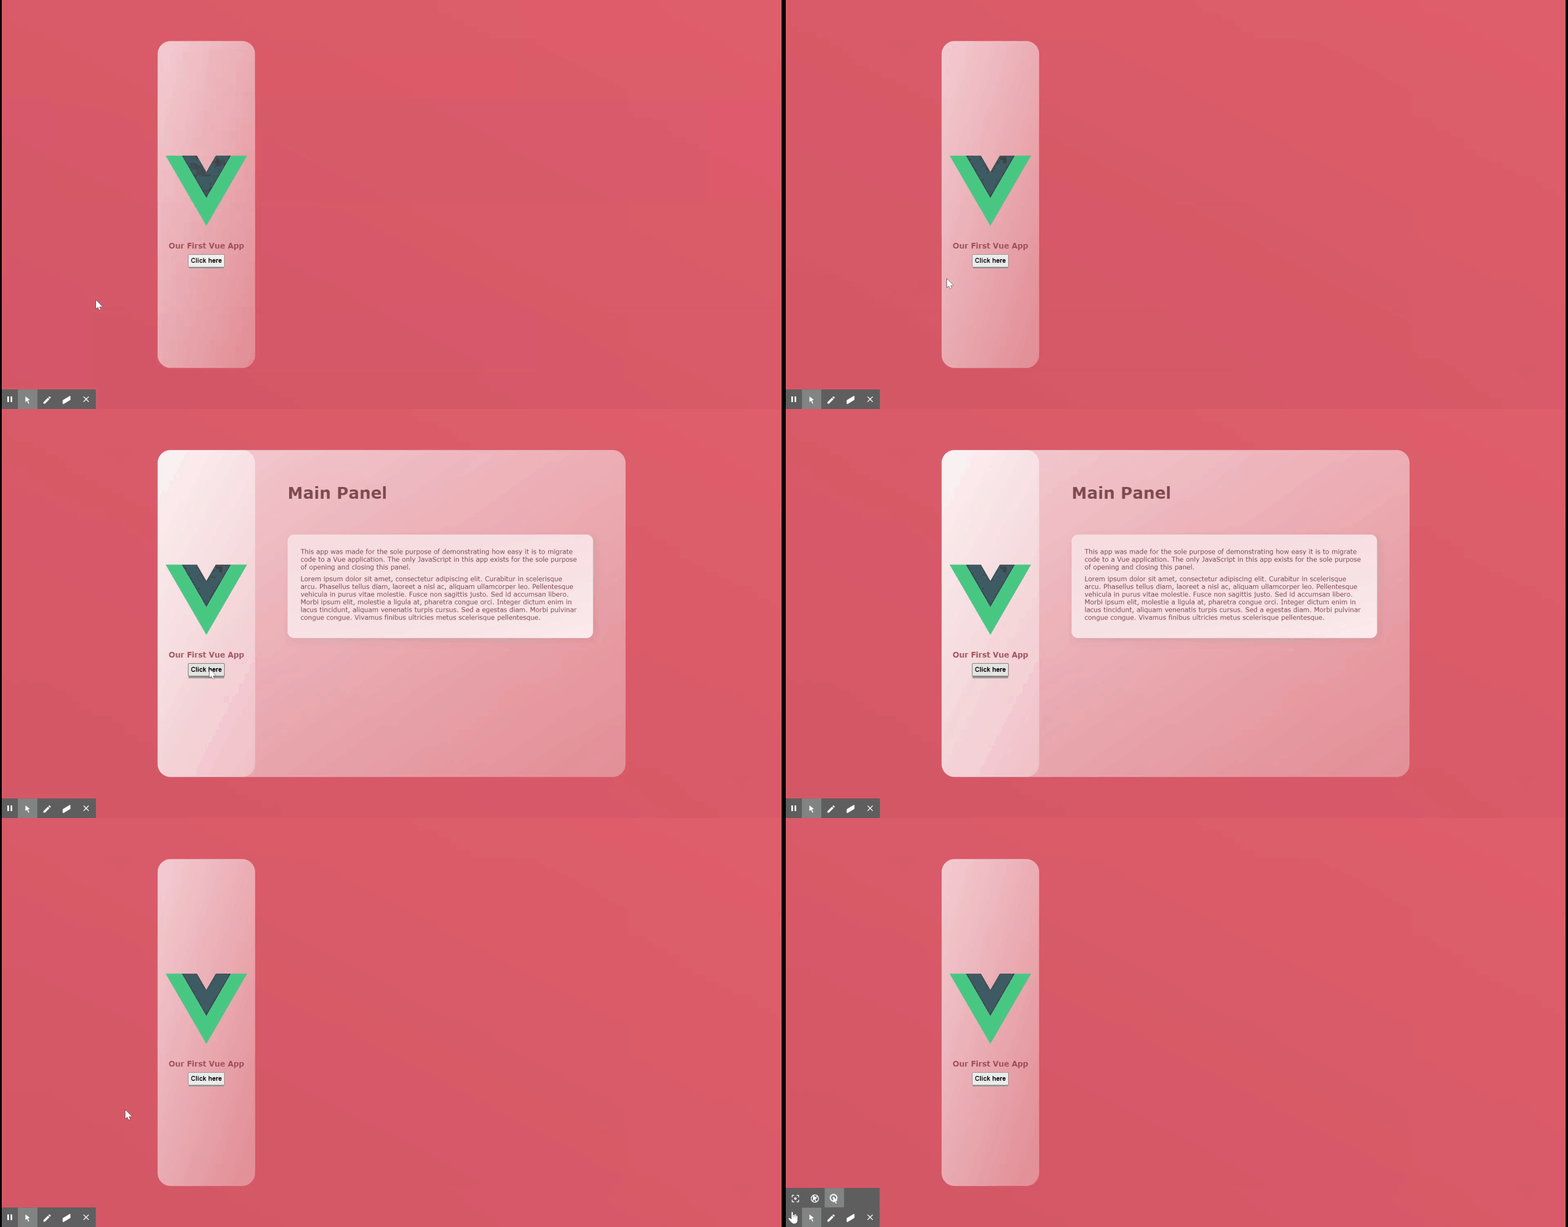
In this section, we will cover the basics of coding with Vue, how to migrate a simple HTML page over to a Vue application, and how to organize it into components. You can follow along free-style, or you can download and use this simple one-page application I wrote with HTML, JavaScript, and CSS. It’s all in one HTML file: here on github.
Covering the Basic Structure of a Vue File
There are many versatile things you can do with Vue in regards to component structuring, animations, data rendering, and more. But for the purposes of this demo, we’re going to mainly focus on understanding the format of the Vue file. As I said before, a Vue file is reminiscent of an HTML file, divided into three sections: <template>, <script>, and <style>.
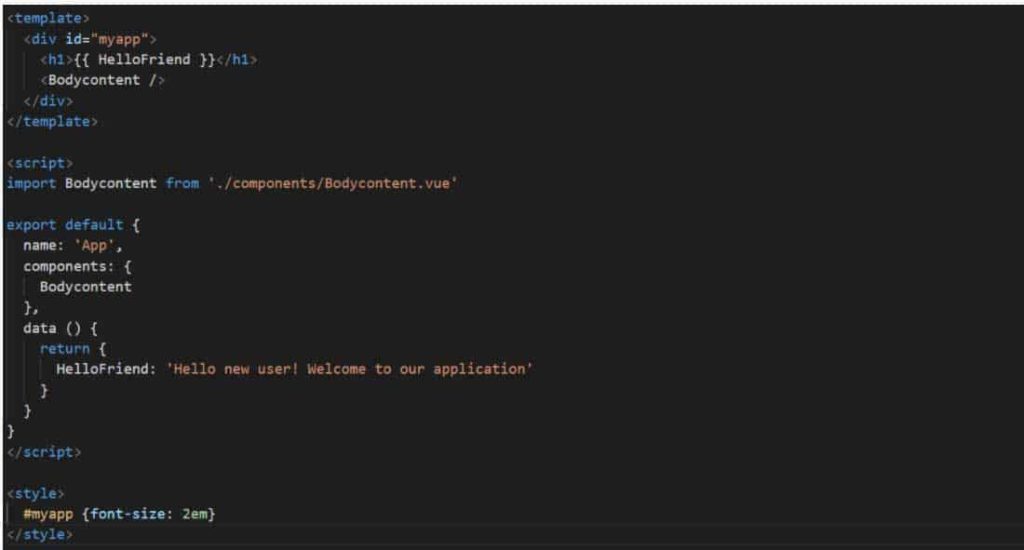
The <template> section is where all of your markdown goes. You only include what would go in the <body> tag of your HTML file – not the <head> tag. When Vue apps are compiled, the components are ‘injected’ into the body of the ‘index.html’ file. If you need to edit your <head> tag (i.e. to add a CDN link), you would do so only in index.html.
The <script> section is where all of the JavaScript goes – just like an HTML file. However, it must be formatted properly within the brackets preceded by export default. There are multiple ways to supply your functions for the app, but for now we’ll just use methods. This will suffice for most functions that deal with user-input. Look at the image above – note that I did not declare hello() explicitly as a function. The app knows it’s a function because it is inside of methods. If you wanted to write another function for methods, you would add a comma after the bracket on Line 12, and list it below.
The <style> section is (you guessed it) where all of your CSS goes. This one has no twists – you can write classic CSS, and what’s even better is that you can restrict your CSS to the specific Vue file. Typically CSS within the <style> tag would affect the whole site. With Vue, to prevent this from happening, you can add the word ‘scoped’ to the style tag like so: <style scoped></style>
Let the Migration Begin
Now that we’ve covered the basics, go to the folder labeled: src. Open up the App.vue file in VS Code. Delete all the content within the <template> and <style> tags.
Copy all of the <body> content — sans the <script> tags — into the <template> section of App.vue. Now copy all of the CSS from the <style> tag in the <head> of the HTML file over to the <style> tag of the App.vue file. Lastly, we need to change the src-attribute of the <img> tag to match the asset that came stock with Vue. The <img> tag should look like this: <img src="./assets/logo.png" alt="Vue logo" />
For the <script> section, we will need to do a little bit more work. Inside these tags we will provide data, write all of our functions, and import components needed for this specific file. JavaScript files that are used by Vue can be written normally. However, when the JavaScript exists directly inside a Vue file, it needs to be wrapped and organized properly. For this demo, we will only need to use ‘methods’, but I encourage you to dig deeper into all possible choices.
Copy the JavaScript from the <script> tag of the HTML file and move to App.vue. Before we can paste our code, we need to add a section inside the `export default` portion. Underneath components, we will add our methods section so that it looks like this:
export default {
  name: 'App',
  components: {
    HelloWorld
  },
  methods: {
    // functions go here
  }
}
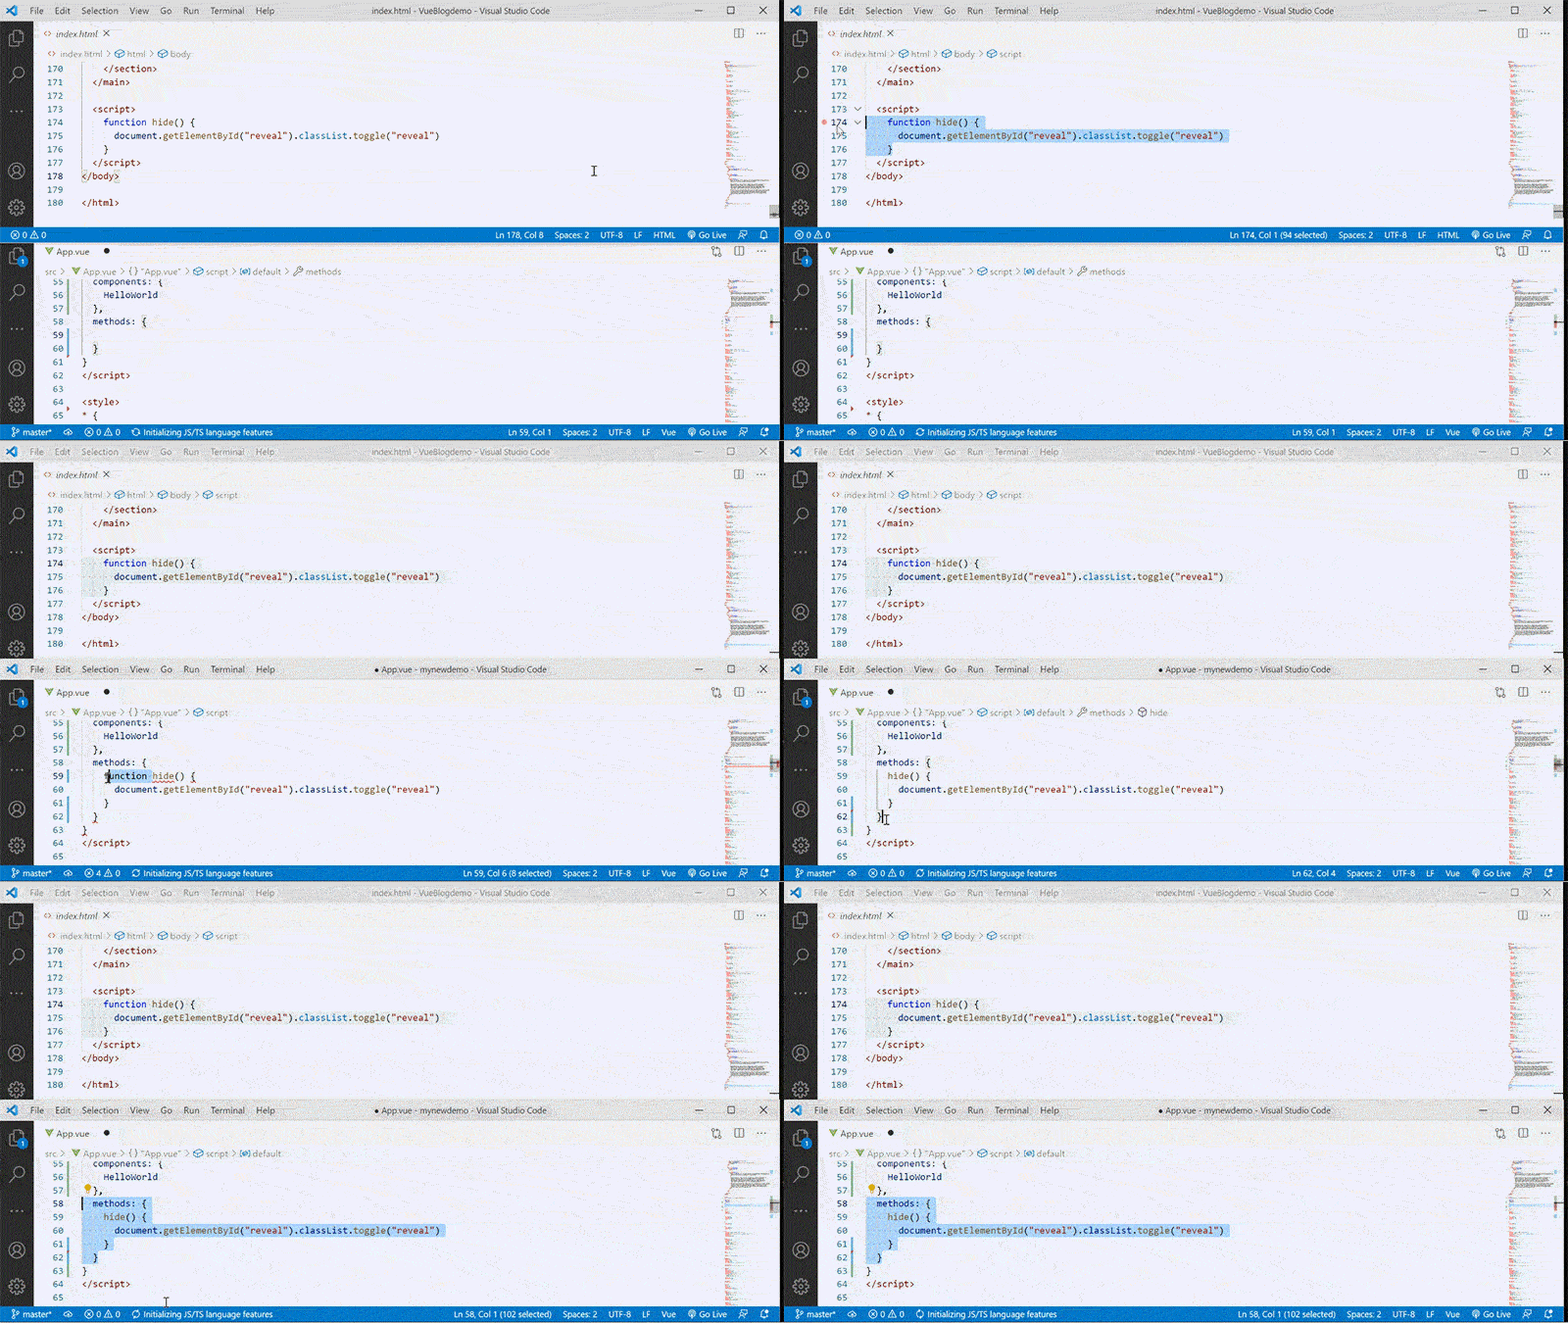
Now we can copy our code over to the Vue app. We do not need to declare it explicitly as a function, and can delete that word. Check out this gif for clarity:
Lastly we need to make a simple modification to the button so that it responds to our JavaScript function. In regular HTML, if you want to give a button click-functionality, you can write onclick=“myfunction()” where myfunction() is anything you want it to be. In Vue however, you would write it like this: v-on:click=“myfunction()”. Not a huge change, but you still have the option to choose between different events by swapping out ‘click’ for things like ‘submit’ or ‘keyup’.
Building Out Components for Reusable Parts
The main reason to use any JavaScript framework is to save time on the coding process. Traditionally, a static site has a new file for every single page – and everything must be re-written. With a framework like Vue, you can build out all reusable parts just once, and then import them to the files you need them.
Now if you were to delete the component HelloWorld and the associated import line, your app should run fine. Right now, the linter will block the application because we are importing a component we are not using – let’s change that!
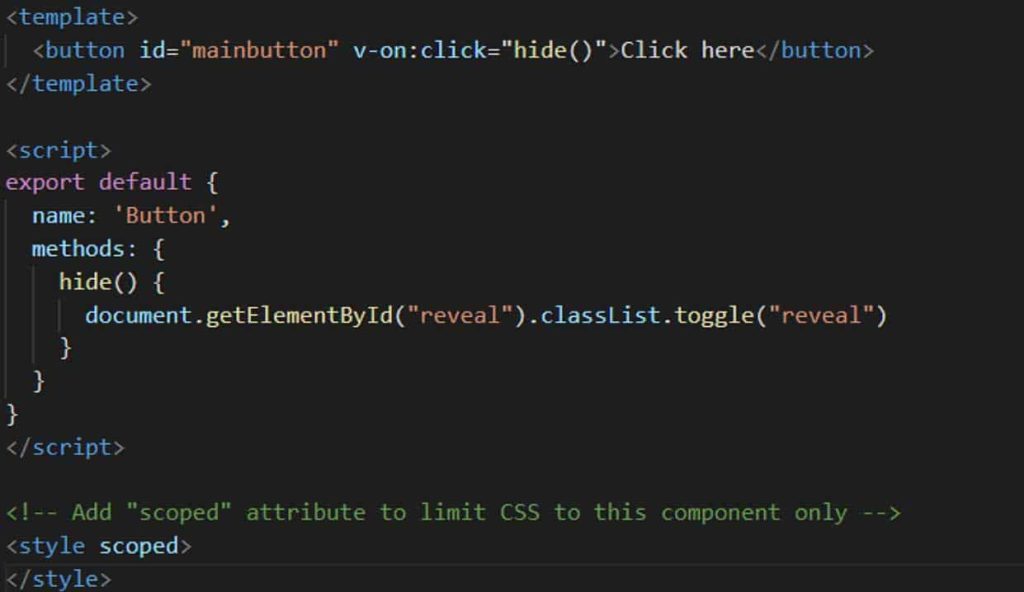
To keep things simple, we’ll wrap this tutorial up by turning the button into a component. Inside src, open up the folder labeled: components. Open the file ‘HelloWorld.vue’ and rename it as ‘Button.vue’. As before, delete everything inside the <template> and <style> tag. Now from the ‘App.vue’ file, copy and delete the button from the HTML. Then paste the HTML code into the <template> tag of ‘Button.vue’. Inside the <script> tag, change the name to ‘Button’ and delete the props section – we won’t be using it today. In its place, copy over the methods section from ‘App.vue’ and paste it below the name section. See the image below for the Buttton.vue file:
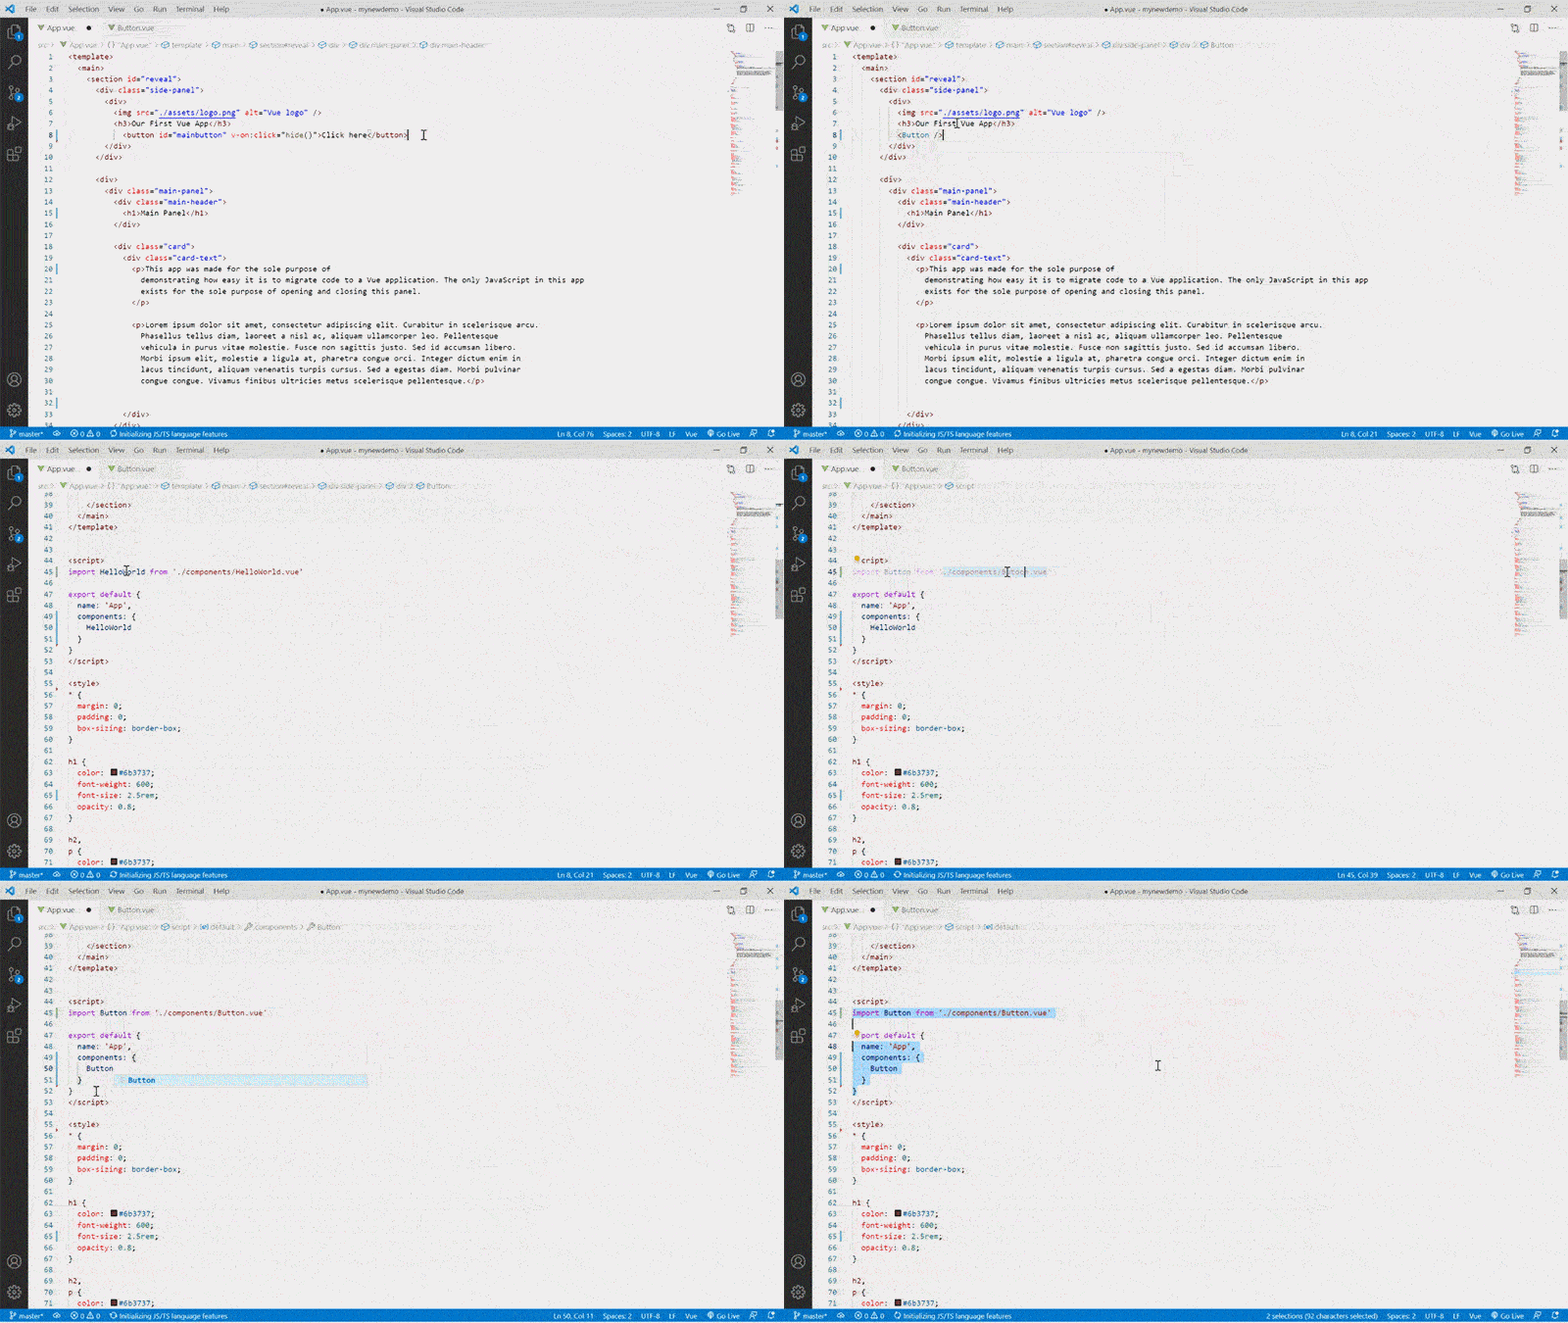
Lastly we need to modify ‘App.vue’ to import the Button properly. In the <script> tag, replace each instance of HelloWorld with Button. Don’t forget to do this for the file path as well to make sure the file matches the new name. Once we are done, we can replace our button in the HTML with: <Button />. This will import the component to that location in the markup. Serve your Vue app again and open it on your local host to check your work. To get a sense of how easy it is to rearrange your page with Vue, experiment by moving the <Button /> component around the page! See the gif below if you need help:
Congratulations! You just set up your computer for Node development, generated your first Vue application from the command line, and migrated a basic HTML page. Take this knowledge and try to translate a basic JS/HTML/CSS app of yours over to Vue. Or simply mess around and build this app out further. Tune in soon for our next Vue blog where we will go over how to host your Vue app online.

About Great Big Digital
Achieve your website goals with customized data, intuitive UX, and intentional design.

