Facebook Marketing for Beginners
First of all, let’s face it, Facebook is a pay to play market. Sure, you may be able to organically reach about 10 percent of your targeted audience off of your page but without boosting your post, you can potentially miss out on pushing your content to tons of potential customers. Furthermore, imagine if you put up a billboard about your cheese shop and could ensure that only people who like cheese saw that billboard. With Facebook Marketing, that is exactly what you can do! Since Facebook Marketing can be a little overwhelming for the non-technical, we are going to break it down in its simplest form in this blog and cover Facebook Marketing for Beginners.
When starting a Facebook Marketing campaign you have a few options. One is to do it through Ad Manager, which is good for the personal users (bloggers, people who don’t manage multiple accounts) or create a Facebook Business Manager (recommended). The Business Manager allows for multiple pages/ads, accounts/people, and more. I’d definitely recommend creating a Business Manager even if you are a single person with a single account, as it will help you down the road as you expand into more complex Facebook Marketing.
Create a Facebook Business Manager Account
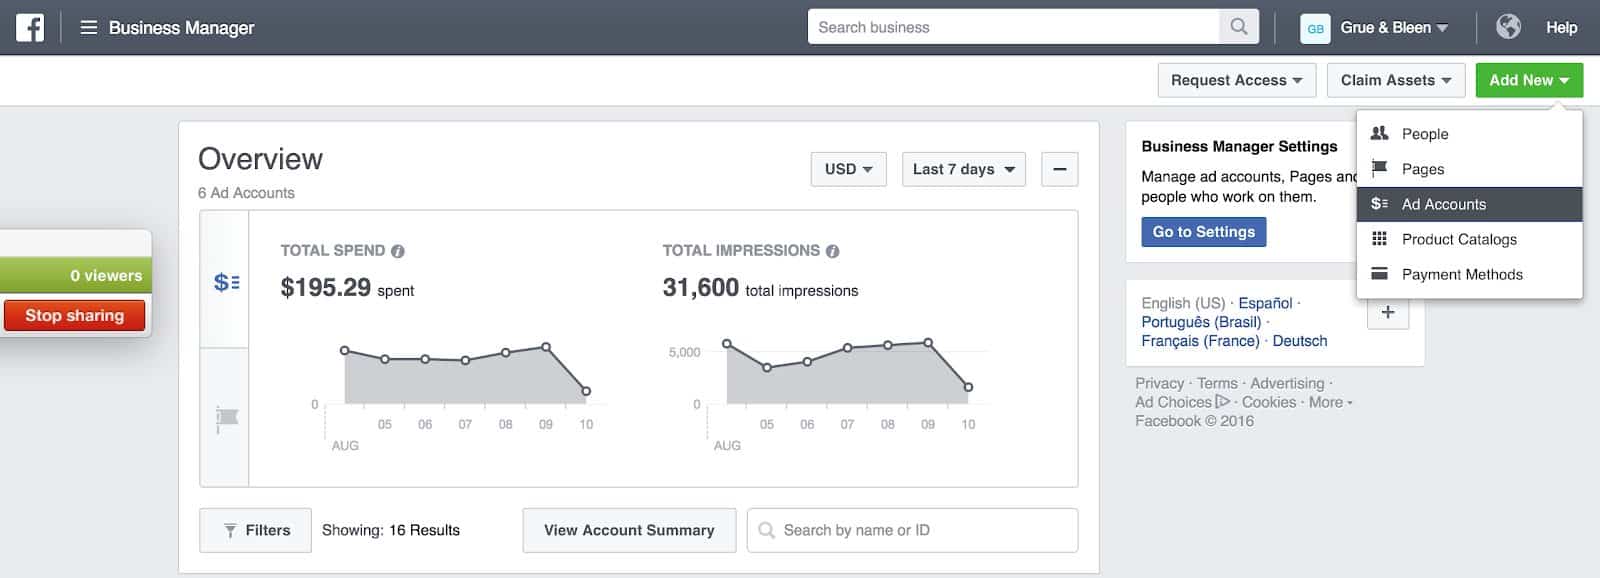
Go to business.facebook.com to get started with a business account. Once you create one, assuming you don’t have an ad account yet, click on add new ad account.
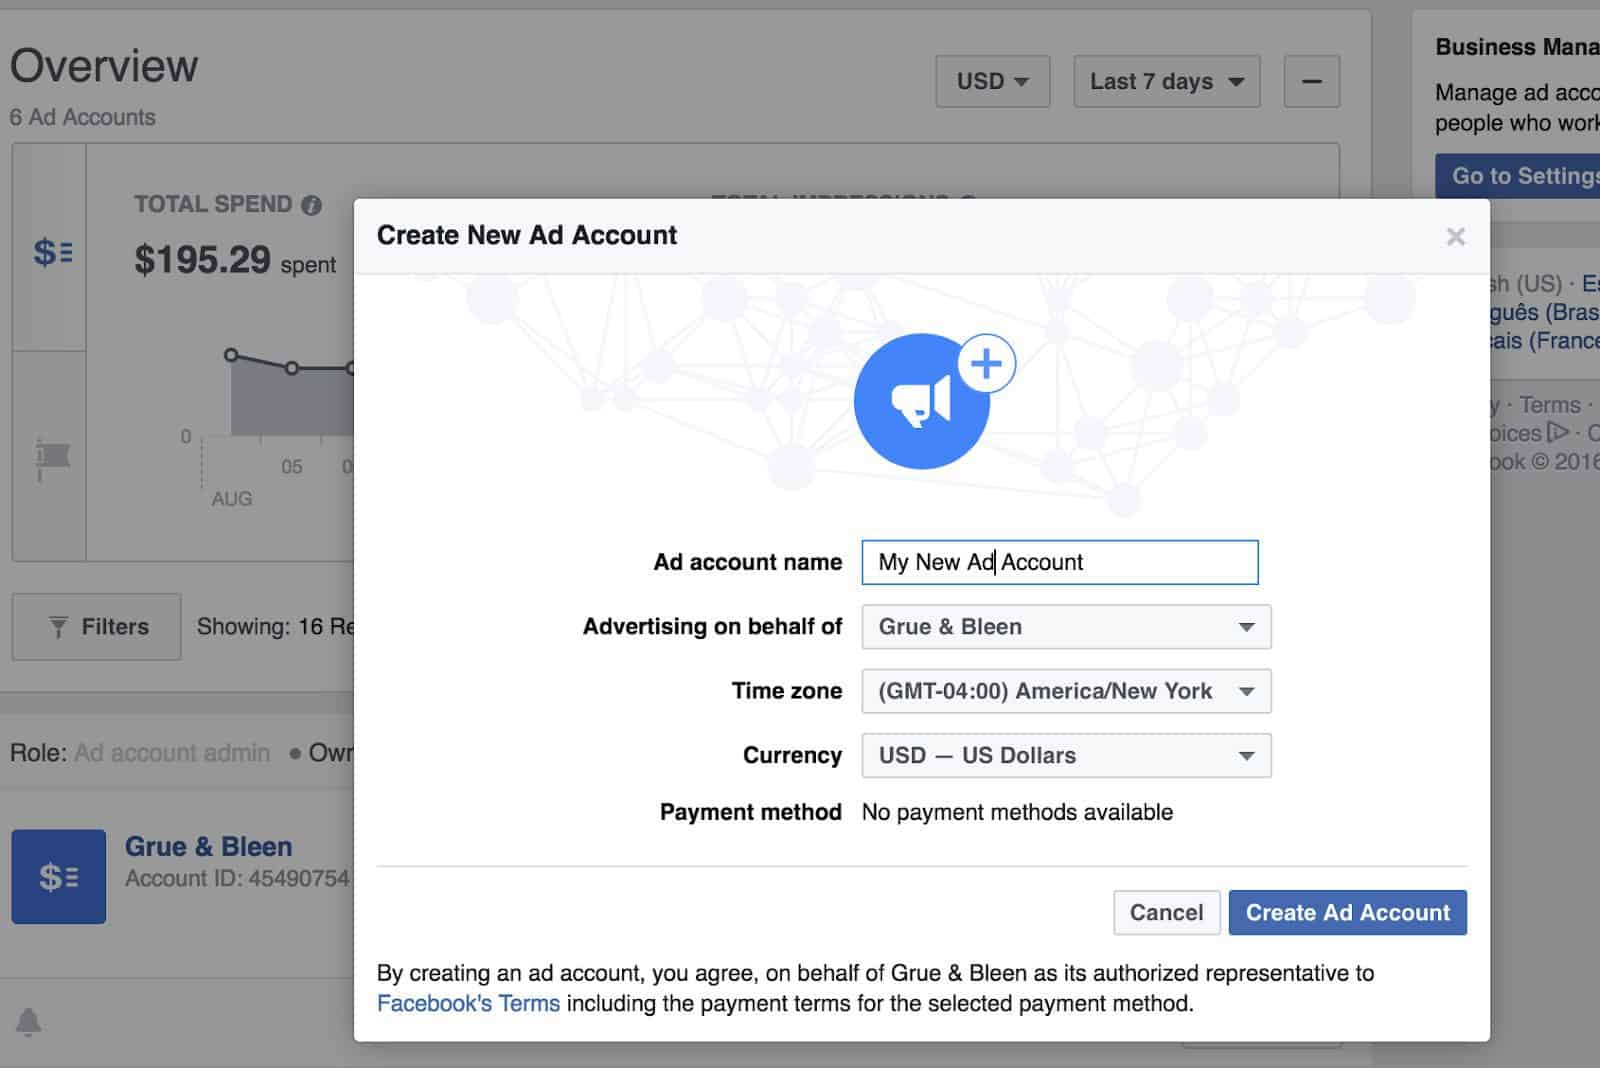
From there you will be prompted to create a new ad account. Follow these steps to create your ad account.
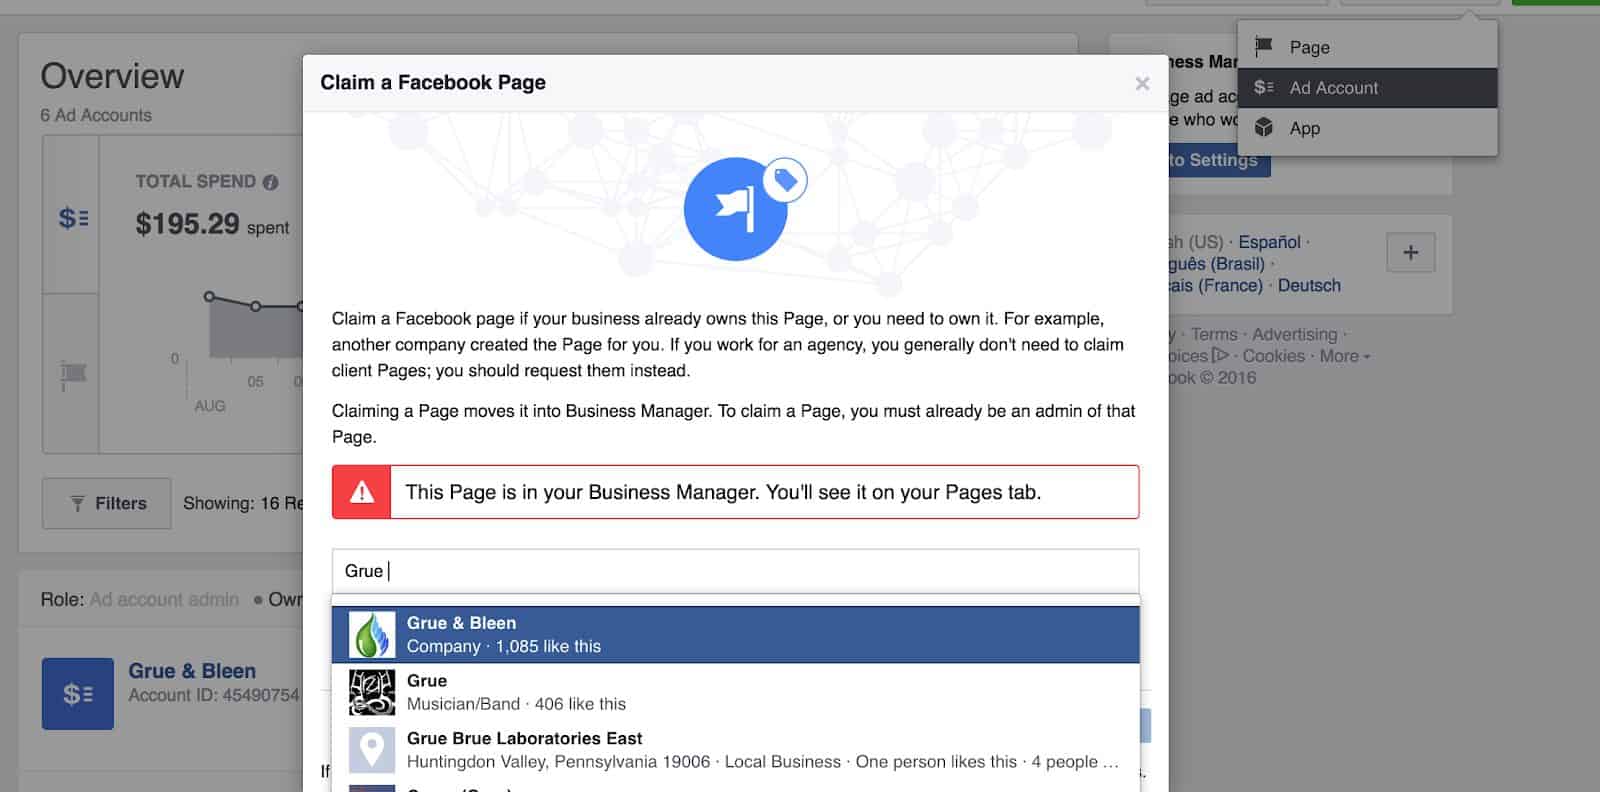
You will also want to “claim” your Facebook page. Click Claim a Facebook Page. Search for your Facebook page, and if you’re an admin, the request should be automatically approved.
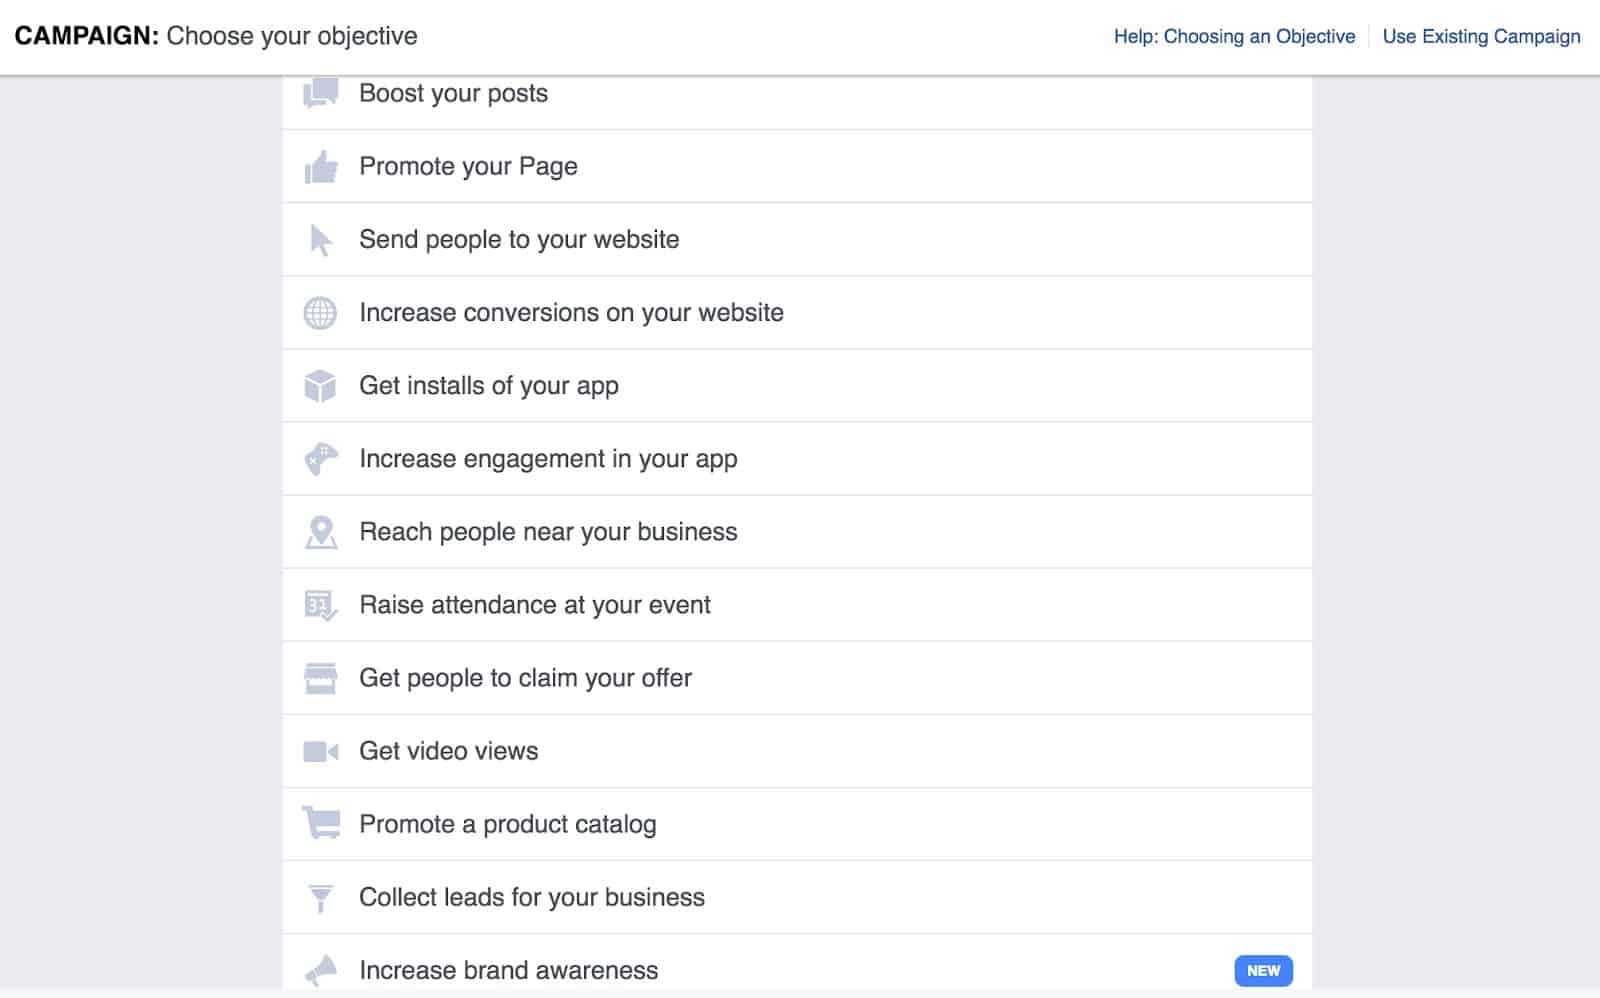
Once you have both your ad account and pages click on your ad account. If it’s a new ad account you will be prompted to choose a campaign. There are multiple different types of campaigns though, so which one is right for you? Here is a brief explanation of each one.
Different Types of Facebook Campaigns
Boost Your Posts
When you post content on your page you typically only reach 1/10th of your likes organically. Boosting your posts can push it out to a much wider audience, where you can target your Facebook page followers, their friends, or any custom group you’d like.
Promote Your Page
This campaign helps build a base by encouraging people to like your Facebook page. This is a good starting campaign if you just want to gain exposure and help boost the popularity of your FB pages.
Send People to Your Website
This campaign allows you to create ads for your site that people can click to leave Facebook and go directly to your site. This is highly recommended if you are looking to do content marketing.
Increase Conversions on Your Website
This is a more complex concept but basically, this helps optimize content for users that Facebook expects to perform a specific action on your website. This can often involve a complicated setup and can be confusing for beginners so we will skip the implementation walkthrough for now.
App Installs
This campaign encourages people to download your app and pushes people to the store where your app is hosted.
App Engagement
This campaign encourages people to use your app more and engages them.
Reach People Near Your Business
This campaign is geared towards local business who would like to reach people who are nearby. This is a relatively new campaign and an excellent option for brick and mortar shops.
Event Responses
This campaign is for Facebook Event awareness. It’s similar to boosting your page or post but the focus is instead on an event.
Get People to Claim Your Offer
This campaign is for store specials that are running for a limited time. They work similarly to the conversion tracking but with specific values (ecommerce).
Increase Brand Awareness
This is similar to a like/website campaign but instead of paying per click you are optimizing for impressions (amount of people who see your ad).
Collect Leads for Your Business
This campaign actually allows you to get emails and names from people directly on Facebook. You create a lead generation form and Facebook will display your ad. When someone clicks the ad a lead generator will pop up and they can “sign up for your email list”. These emails are then stored on Facebook and you can export them.
Product Catalogue Sales
This campaign is for an ecommerce business. You can upload a product catalogue or feed and have Facebook promote it to a targeted audience.
Which is Right for You?
With so many campaigns, how do you know which one to choose? Well, that’s really up to you and should take your marketing objectives into consideration. A nice introduction is the Send People to Your Website campaign, and principles of that campaign can be applied to all of the other choices. Let’s take an in depth look into setting up a Send People to Your Website” campaign.
Picking Your Objective and Setting Up Your Ad Set
Now we get to choose our targeting and see the power of Facebook Marketing. There are two options: create a new custom audience (which we will not be covering in this tutorial but is extremely powerful) or choose your targeting.
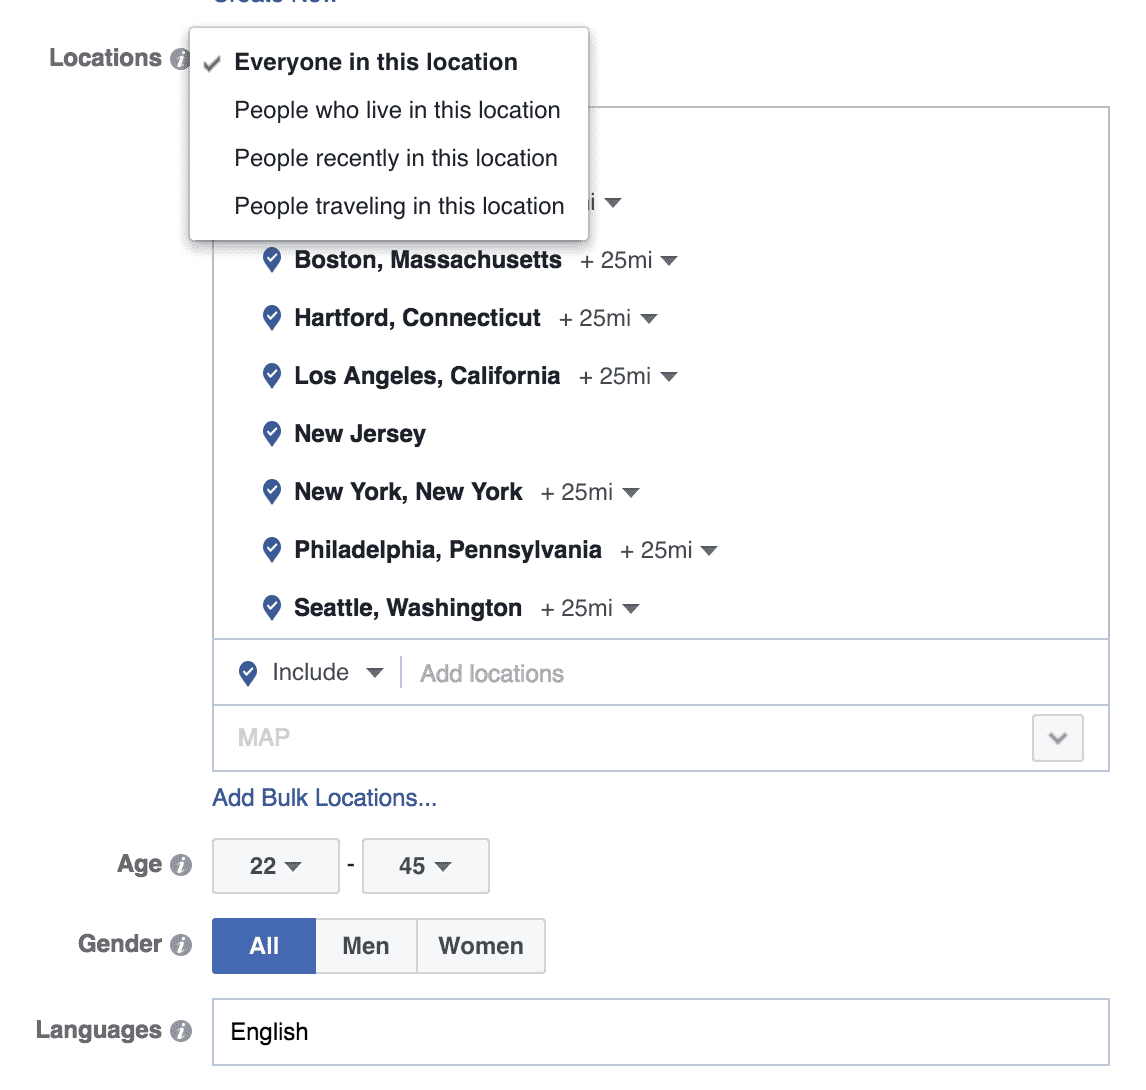
Demographics and Regions
In this section you can choose specific cities, regions, genders, ages, and languages, which can be very beneficial if you know your targeted markets. You can finetune your location targeting by selecting the radius of how many miles around the city you’d like to focus in on or you can focus specifically on the current city only. You can also choose to target people who live in the location(s) you’ve selected, people who travel in the location(s) you’ve selected, or people recently in the location(s) you’ve selected.
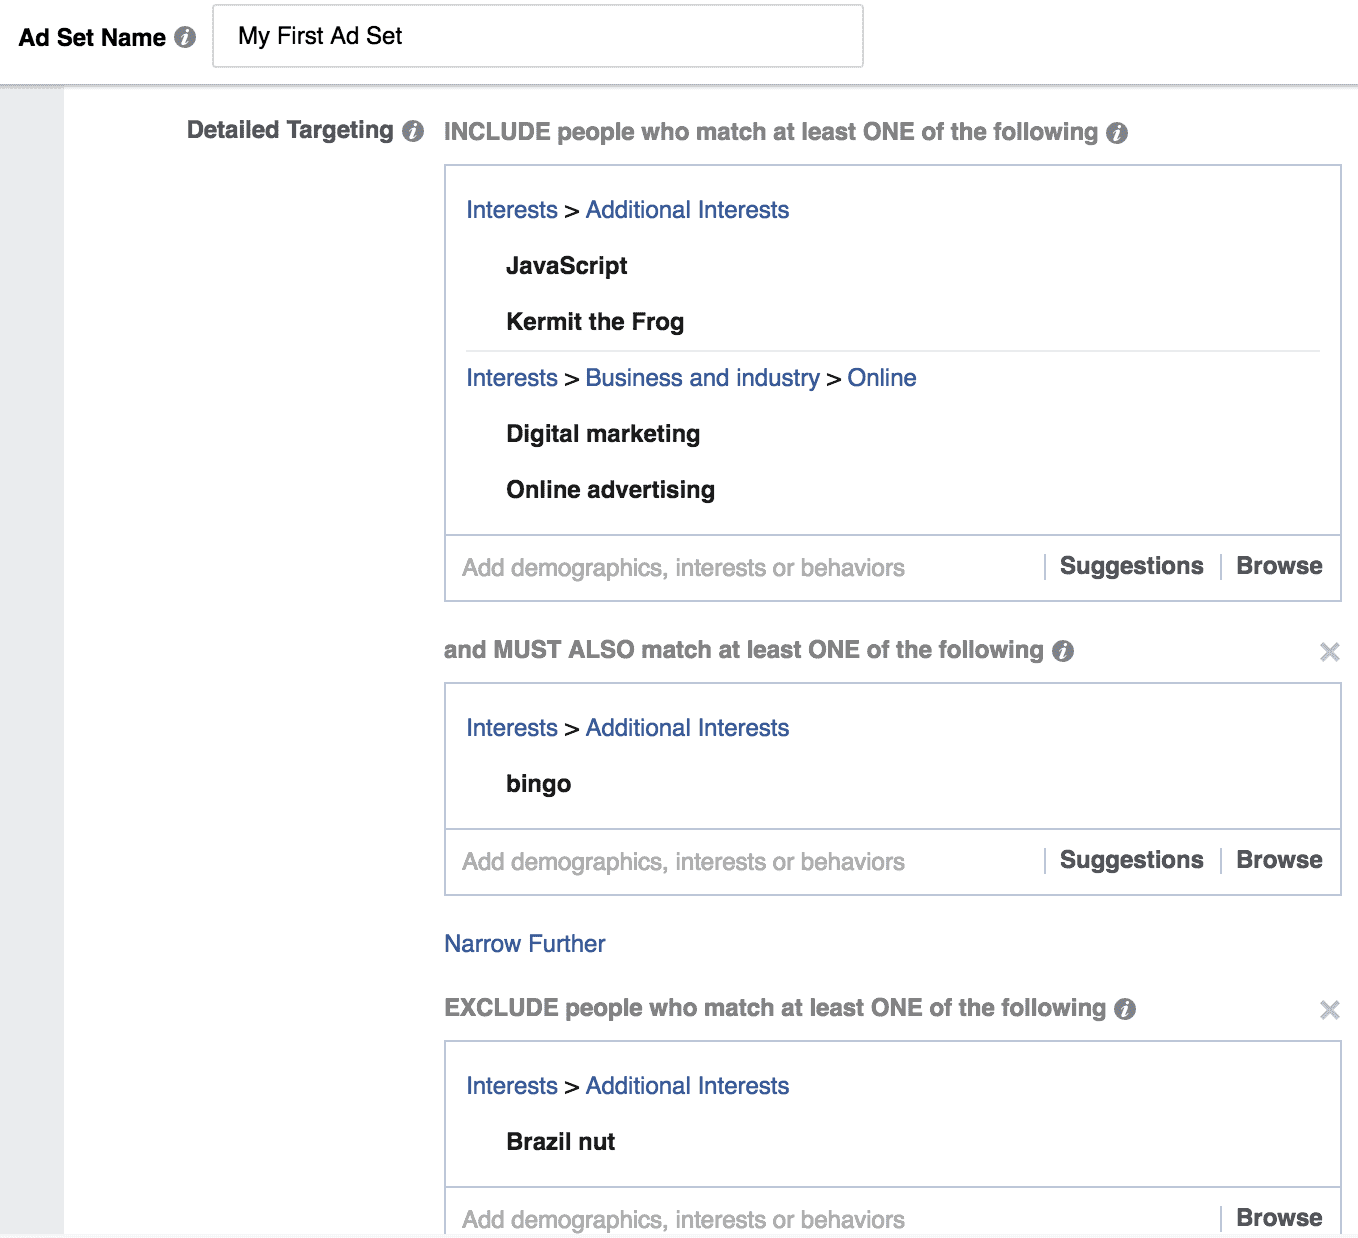
Interests and Likes (i.e. Detailed Targeting)
Every time you like something on Facebook, it is saved in Facebook’s massive database of interests, which is what makes Facebook one of the most incredible marketing platforms in the world. You can directly target people who like things similar to your product/service. Furthermore, you can narrow interests down by choosing combinations of interests that a consumer must have to target them (see our silly example below) and exclude people you do not want to target. This is absolutely the most powerful tool in the Facebook user interface.
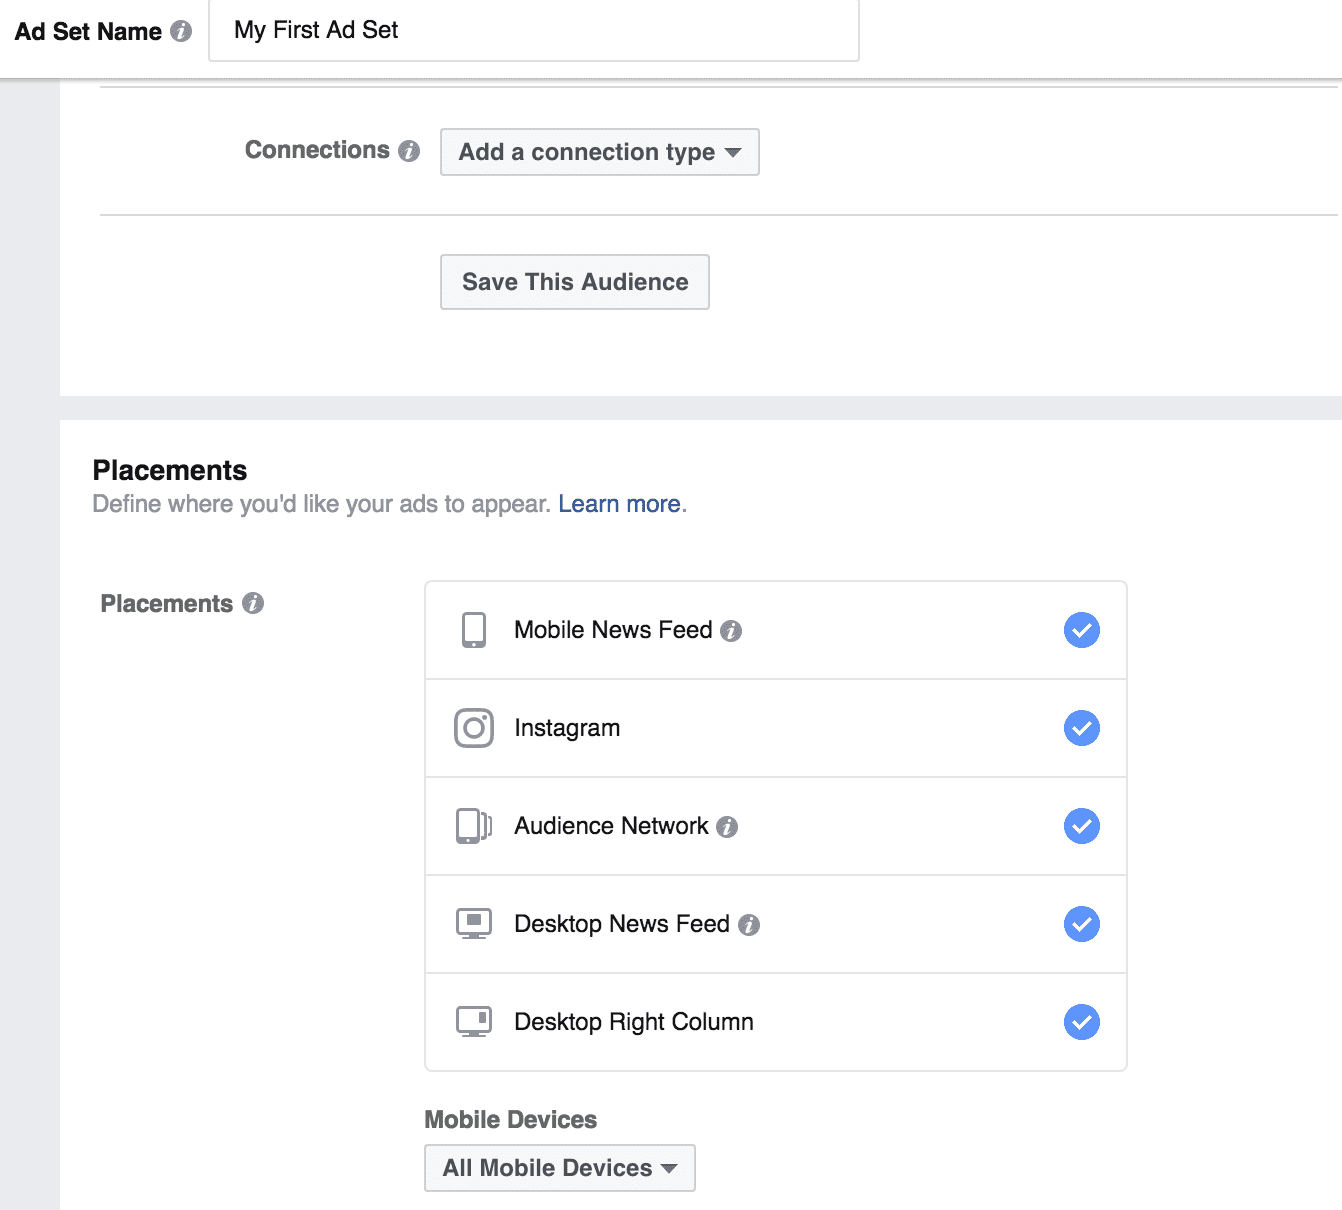
Add a Connection Type and Pick Your Placements
Oftentimes you’ll want to target people who like your page and their friends if you want your post to gain more likes and shares on new content. You can do this with connections by selecting to show your ad to people who already like your page. Sometimes you want to do the exact opposite and make sure only new people who don’t know your brand see your ads. You can also do this with connections by excluding people who like your page.
After you’ve selected all of your targeting you can save that audience criteria so that you can easily pull it up again. You don’t have to save it but it’s recommended and will save time. Finally, pick the placements that you’d like it to show up on. If your website isn’t mobile optimized I’d suggest deselecting the mobile news feed button and then immediately head over to our contact section so we can build you a new website :). Oftentimes I will deselect the audience network as Facebook will heavily use most of your budget on advertising off of Facebook. I like to make sure my ads are showing up on Facebook though so I will typically deselect this option.
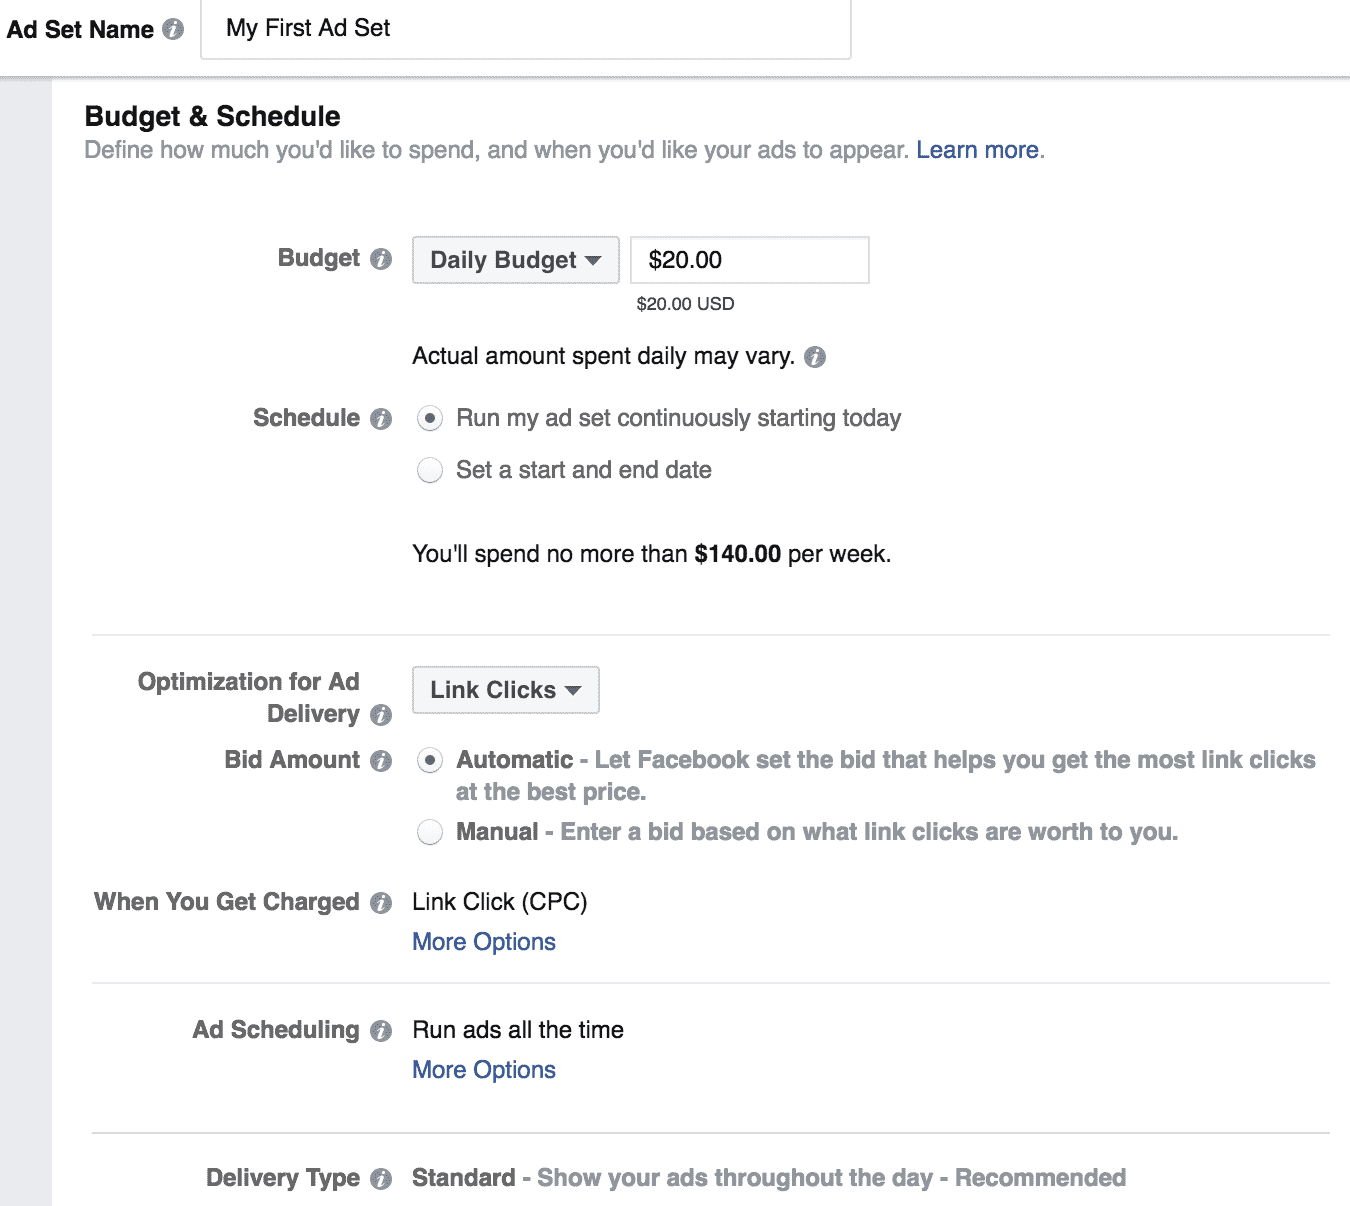
Budget and Schedule
In this section you can select a daily or lifetime budget (as those who also work with Google AdWords know, having the option of lifetime budget is a very nice feature). Make sure to triple check your budget though, especially when you are setting on for a lifetime! Imagine a lifetime budget of $10,000 being spent in one day because you mistakenly selected a daily budget. Not fun.
From there you can schedule the dates you want your ads to start and stop. Facebook will automatically choose the optimization of ad delivery that fits the campaign you selected but you can change it as you see fit. You can also set manual bids here.
If you are running a lifetime budget campaign you can also create a schedule of specific times that you want your ads to show, for instance from 9-5. If you are running a daily budget ad though, this is not allowed as Facebook will optimize all the clicks during various times of the day to make sure you hit your daily budget.
Finally, click continue and you’re off to the final section; building the ad itself!
Facebook Ad Guide
Here is where you get to be creative, which arguably is the hardest part. Facebook has some stubborn rules and character limitations that force you to conform to a pretty specific template. With that said, you can split test so many different creative directions that you really can fine tune your campaigns with multiple types of images, videos and copy. Let’s walk through the steps.
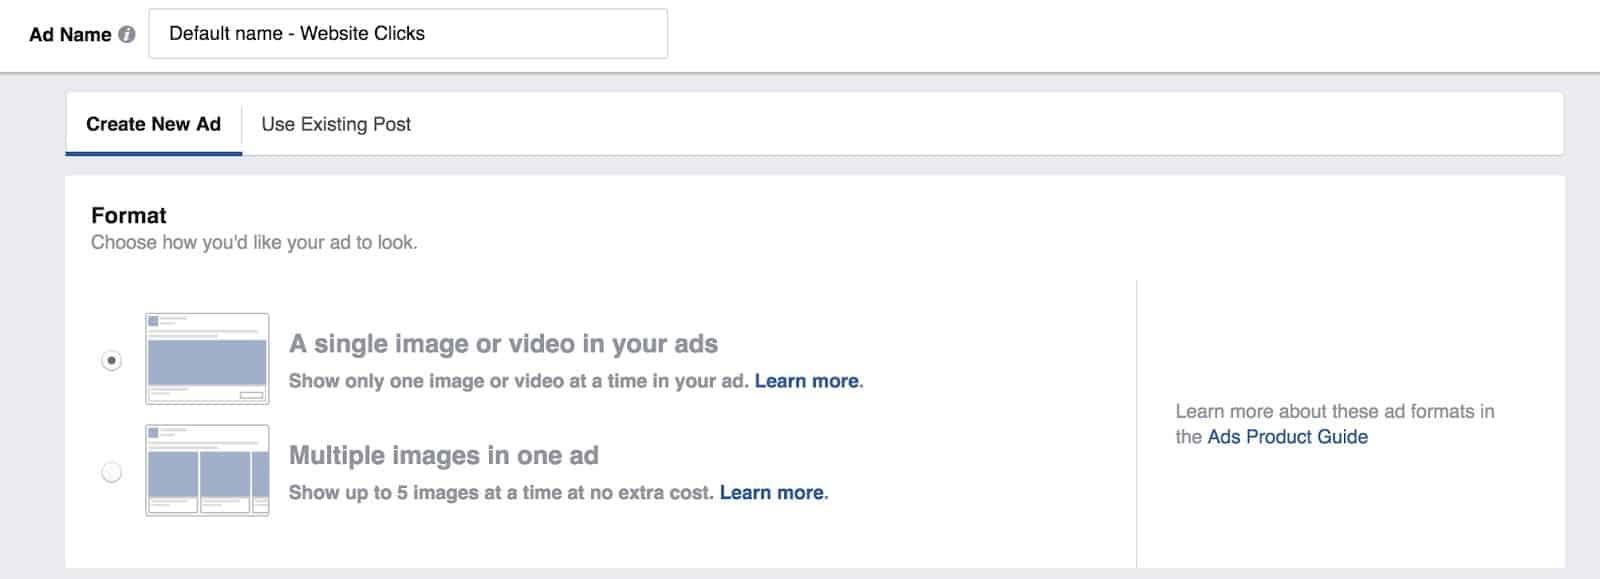
Pick Your Ad Format
This section allows your to pick your ad format. You can select from using a single image, a video, or multiple images in a carousel format. For this tutorial, we will be focusing on the traditional image, but definitely explore the other options!
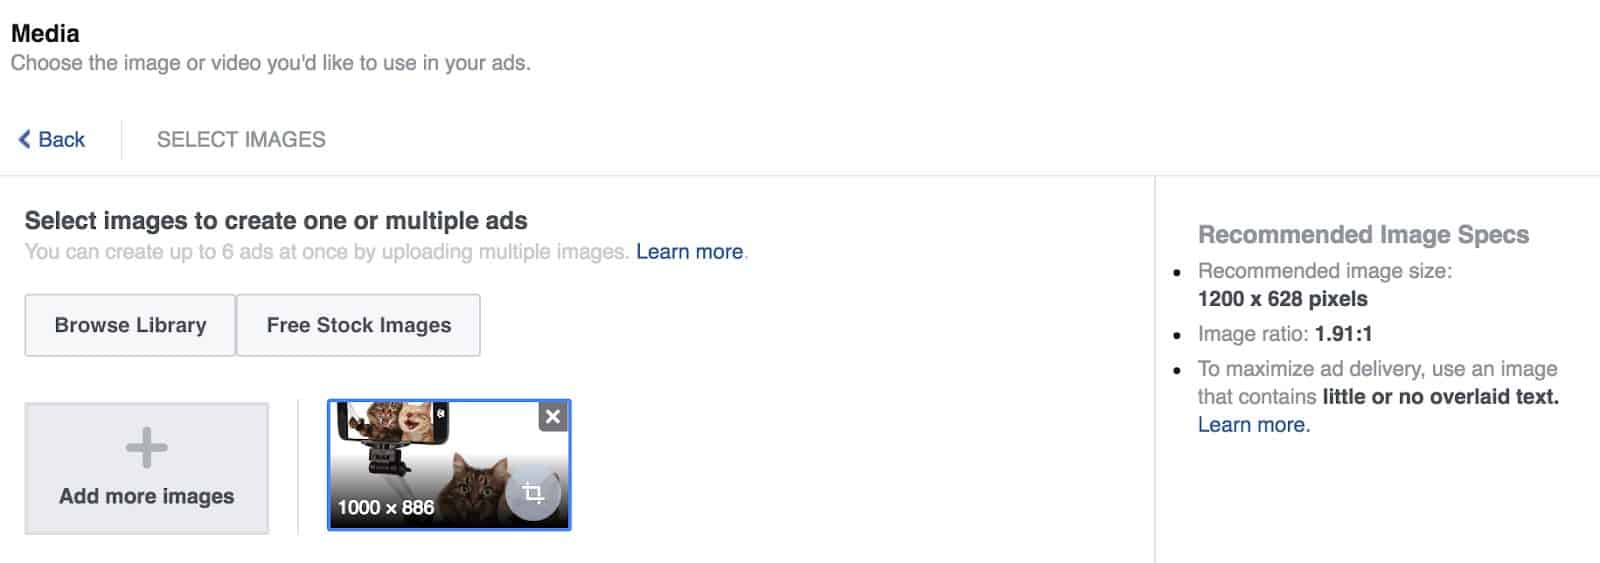
Select Your Facebook Ad Image(s)
Facebook now makes it super easy to grab stock images from a large selection provided by Shutterstock. Definitely take time to look through the near endless library of photos. If you’d like to use a custom image, make sure it’s optimized for Facebook’s platform. Images should be 1200×628 pixels and have an image ratio of 1.91:1. You also should limit text in your image, since Facebook has a rule that text can only take up 20% of the real estate of the entire picture. Keep that in mind as you are creating your image that your ad will not be approved if it includes too much text in the image.
Create Your Ad Copy
First you will want to connect your page to your ad in this section. If you own and have claimed both in the business Facebook account you should see your pages available for use in this section. Next put in your website URL. I’d highly suggest slapping on some UTM parameters on it so you have a better sense of what the campaign is doing comparatively. If you don’t know what those are, jump on over to my Top Ten Google Analytics Tips blog post for a brief explanation. Next, create your copy. Below is the character limit for the Facebook ad copy. Be succinct, fun and make yourself stand out.
- Text: 90 characters
- Headline: 25 characters
- Link description: 30 characters
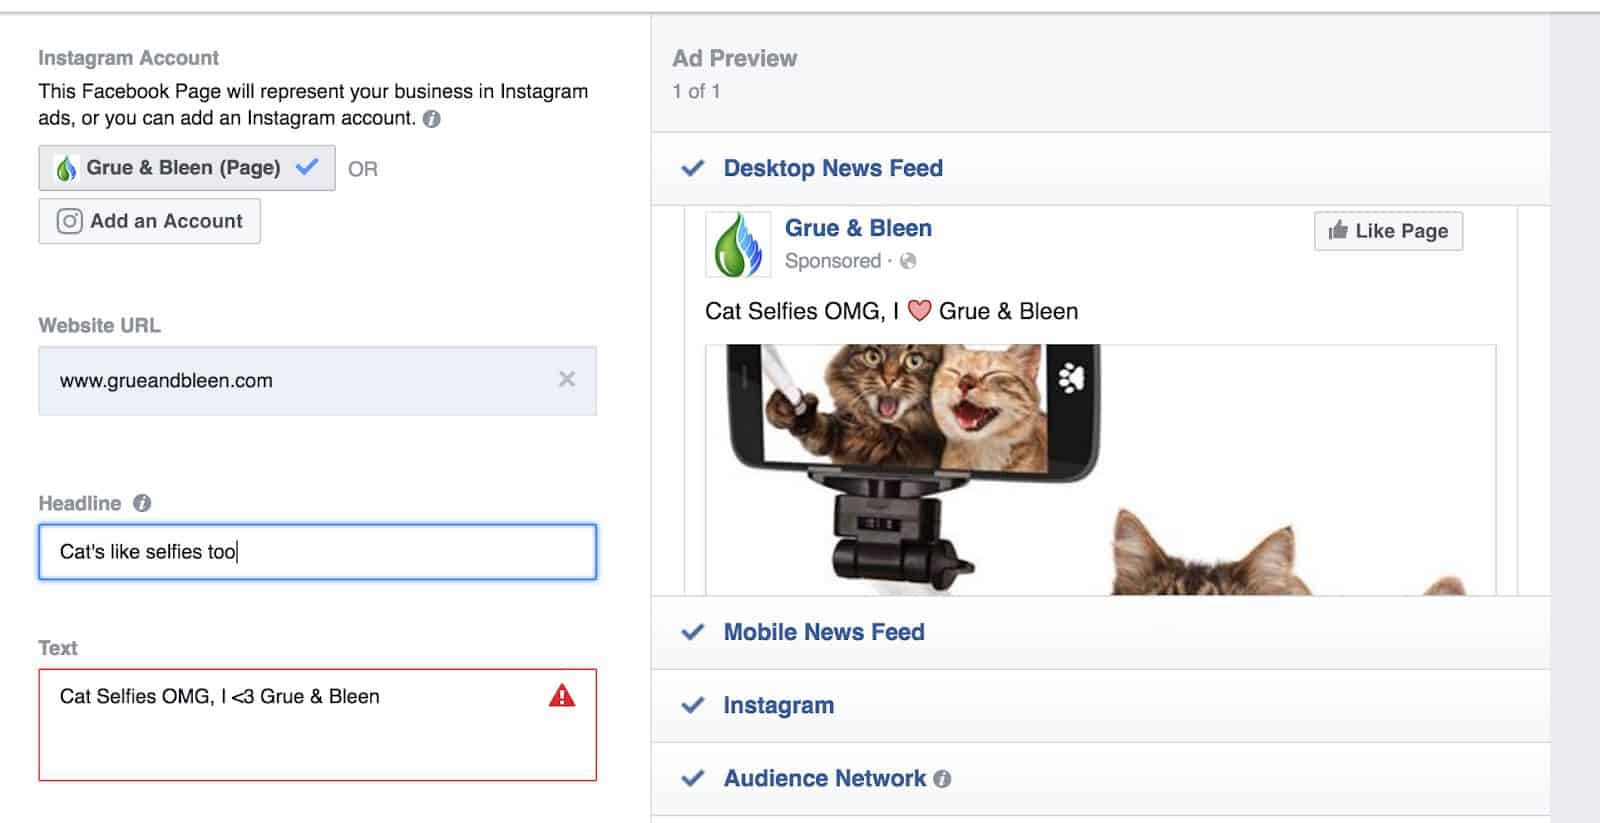
You then have the ability to add a few more options such as a call to action button (sign up now, learn more, etc), news feed text which only shows up when the ad is on your desktop Facebook Newsfeed, a display URL, UTM parameters, and pixel tracking (to be discussed in a different post). On the right you can toggle the view to show what your ad will look like in different browsers.
Now that everything is done, go ahead and place your order. There will be a review process and once your ad is approved you are on your way!
There are so many possibilities and options when first looking at running a Facebook campaign that it’s easy to get overwhelmed. Just remember, try different types of campaigns and see what works best for you. There is no wrong! If you are feeling too overwhelmed, contact us about custom setups and inclusions. We can quote you on a full service digital marketing package that is right for your company. Until then, good targeting!

About Great Big Digital
Achieve your website goals with customized data, intuitive UX, and intentional design.