Building a Custom Beaver Builder Module

Beaver Builder is a great visual design tool for WordPress. It has an easy drag-and-drop interface that allows for a high level of customization while not getting in the way of regular WordPress development. In addition to the basic modules that come out of the box, Beaver Builder allows for the creation and installation of custom modules.
You may have noticed that there are commercially available collections of modules like the Beaver Builder PowerPack, which includes super helpful things like a modal popup, testimonial slider, and integrations with popular contact form plugins. These really expand what we can do with Beaver Builder, but what if you can’t find exactly what you want? Are you stuck with what you got? Yep (just kidding! Re-read the title of this blog post!).
Why Not Build Your Own Beaver Builder Module?

The official Beaver Builder documentation is actually really good, and I’d encourage you to read through it and use it for reference as you develop your own module. The wall of text may be a little bit overwhelming though, so I hope this post demystifies the process a little bit and gives you a good starting point for your own module.
For demonstration purposes, I’ve built a simple module with the following functionality:
- Allows user to enter either a YouTube URL or select a video file
- For YouTube video, automatically select thumbnail
- For video file, allow user to manually select thumbnail image
- Show lightbox with video when thumbnail is clicked
- Allow user to select “dark” or “light” theme
- That’s it!
Note: If you just want the video lightbox module to use on your site, download and install it like you would any other WordPress plugin. It’ll then show up under “Custom Beaver Builder Modules” when you go to add content in the Beaver Builder editor.
Let’s Look at the Code!
To start off, download the code and we’ll walk through it together.
We’ll focus on just a few files in the plugin. There are some extra files we won’t touch on in this post, but if there is interest we can go into those in a more advanced tutorial.
cbb-modules.php
Location: cbb-modules/
Purpose: Load your custom module(s), in this case just our Video LightboxDefine settings for the module(s)
Important code snippet:
FLBuilder::register_module( ‘CbbVideoLightboxModule’, array(
‘general-tab’ => array(
‘title’ => __( ‘General’, ‘fl-builder’ ),
‘sections’ => array(
‘source-section’ => array(
‘title’ => __( ‘Source’, ‘fl-builder’ ),
‘fields’ => array(
‘video_title’ => array(
‘type’ => ‘text’,
‘label’ => __( ‘Title’, ‘fl-builder’ ),
),
‘video_type’ => array(
‘type’ => ‘select’,
‘label’ => __( ‘Video Type’, ‘fl-builder’ ),
‘default’ => ‘File’,
‘options’ => array(
‘file’ => __( ‘File (.mp4, .mov, etc)’, ‘fl-builder’ ),
‘youtube’ => __( ‘YouTube Video’, ‘fl-builder’ )
),
‘toggle’ => array(
‘file’ => array(
‘fields’ => array( ‘video_file’, ‘thumb’ )
),
‘youtube’ => array(
‘fields’ => array( ‘video_url’ )
)
)
),
‘video_file’ => array(
‘type’ => ‘video’,
‘label’ => __( ‘Video – File’, ‘fl-builder’ ),
),
‘video_url’ => array(
‘type’ => ‘text’,
‘label’ => __( ‘YouTube URL’, ‘fl-builder’ ),
),
‘thumb’ => array(
‘type’ => ‘photo’,
‘label’ => __( ‘Thumbnail Image’, ‘fl-builder’ ),
),
‘theme’ => array(
‘type’ => ‘select’,
‘label’ => __( ‘Theme’, ‘fl-builder’ ),
‘default’ => ‘light’,
‘options’ => array(
‘light’ => __( ‘Light’, ‘fl-builder’ ),
‘dark’ => __( ‘Dark’, ‘fl-builder’ )
)
)
)
),
)
)
) );
You can see that the ‘FLBuilder::register_module’ function takes in two arguments: the module class name (CbbVideoLightboxModule) and a monstrous associative array containing all of the settings we want to allow the user to change. It’s basically a long list enumerating each input element (dropdown, textbox, image picker, etc) that we want to be available to the user to customize the module when they place it on the page. Generally, each setting has a “type” and “label”, with some types having extra properties, like “options” for select boxes.
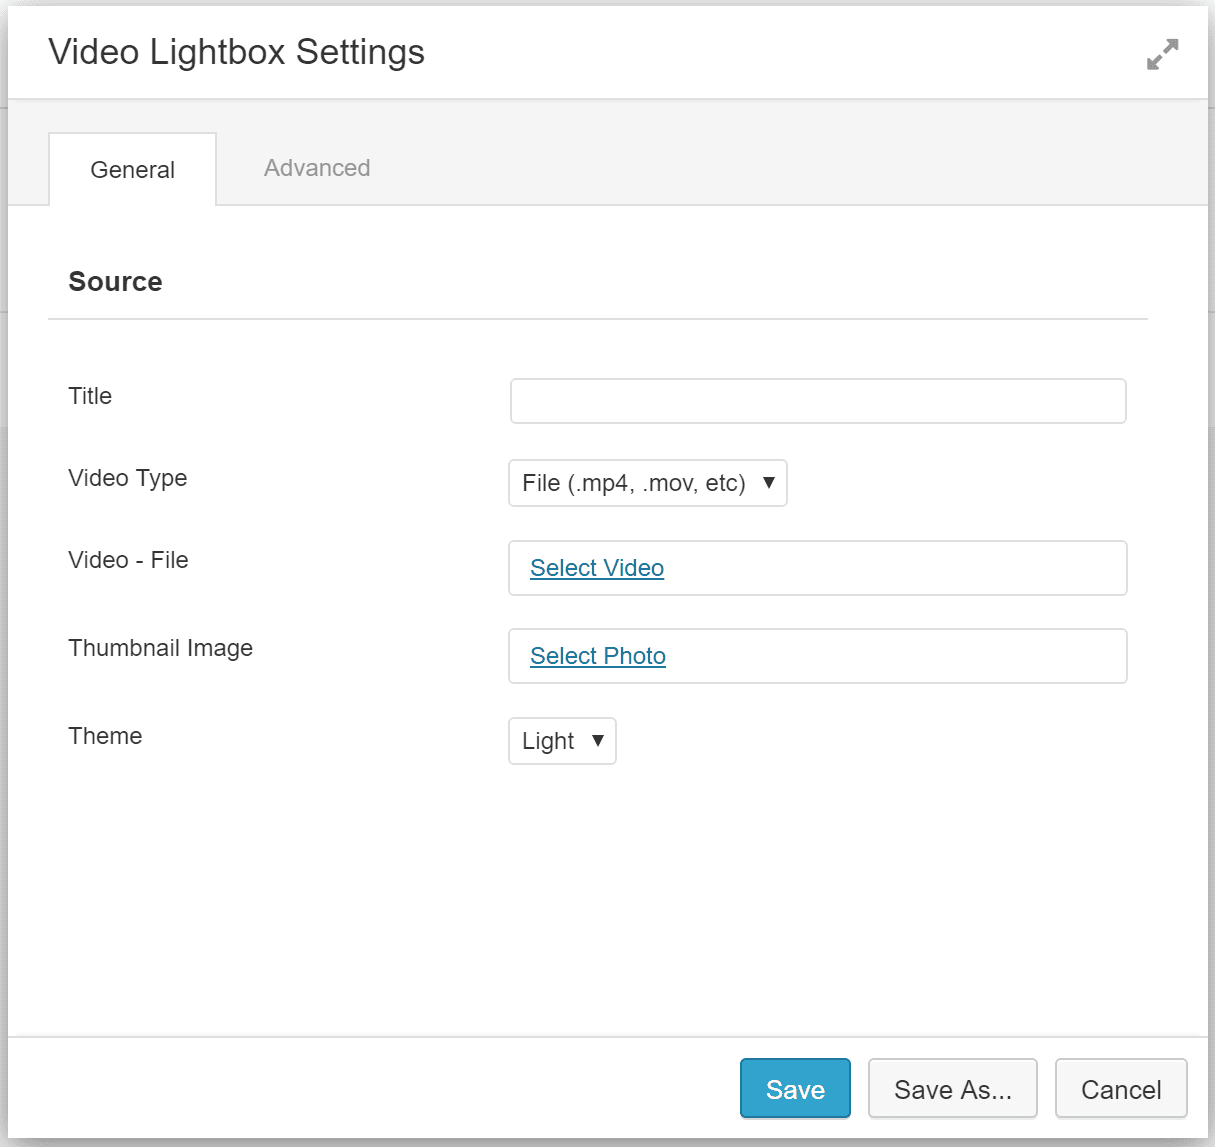
In our case we’ve added settings for:
- Video title (text input)
- Video type (dropdown w/two options)
- For this setting, we add a ‘toggle’ array which specifies that when “File” is chosen, the “video_url” input should be shown, and when “YouTube URL” is chosen, the “youtube_url” input is shown
- Video file (video picker)
- Video URL (text)
- Thumbnail (image picker)
- Theme (dropdown w/two options)
cbb-video-lightbox.php
Location: cbb-modules/cbb-video-lightbox/
Purpose:
- Define some basic settings for the module, like name, description, and category.
- What you set for “category” will be what your moule shows up under in the Beaver Builder “Add Content” panel.
- Define functions used by the module
Important code snippet:
public function __construct()
{
parent::__construct(array(
‘name’ => __( ‘Video Lightbox’, ‘fl-builder’ ),
‘description’ => __( ‘A totally awesome Video Lightbox module!’, ‘fl-builder’ ),
‘category’ => __( ‘Custom Beaver Builder Modules’, ‘fl-builder’ ),
‘dir’ => MY_MODULES_DIR . ‘cbb-video-lightbox/’,
‘url’ => MY_MODULES_URL . ‘cbb-video-lightbox/’
));
}
public function getYouTubeId($url) {
$id=”;
if(strpos($url, ‘youtu.be’) !== false) {
$pieces = explode(‘/’, $url);
$id = $pieces[count ($pieces) – 1];
}
else if(strpos($url, ‘youtube.com’) !== false) {
$pieces = explode(‘v=’, $url);
$id = $pieces[1];
}
$id = explode(‘&’, $id);
$id = $id[0];
return $id;
}
In addition to name, description, and category we define the module’s directory and URL. We also have a single function that will be used later to get the YouTube video ID if YouTube is chosen as the video type.
frontend.php
Location: cbb-modules/cbb-video-lightbox/includes/
Purpose:
As the filename suggests, this is where we define the front-end markup of our moduleUse settings to dynamically output markup based on user’s chosen settings
Important code snippet:
<div class=”cbb-video-lightbox”>
<?php
$video_url;
if($settings->video_type == ‘youtube’) {
$video_url = $settings->video_url;
$video_id = $module->getYouTubeId($settings->video_url);
}
else {
$video_url = wp_get_attachment_url($settings->video_file);
}
?>
<a class=”cbb-video-link” href=”<?php echo $video_url ?>”>
<div class=”cbb-video-thumb”>
<?php if($settings->video_type == ‘youtube’){ ?>
<img src=”https://i1.ytimg.com/vi/<?php echo $video_id ?>/mqdefault.jpg” />
<?php } else { ?>
<img src=”<?php echo wp_get_attachment_url($settings->thumb) ?>” />
<?php } ?>
<i class=”fa fa-play” aria-hidden=”true”></i>
</div>
<?php if(!empty($settings->video_title)) { ?>
<div class=”cbb-video-title <?php if($settings->theme == ‘dark’) { echo ‘cbb-video-dark’; } ?>”>
<?php echo $settings->video_title; ?>
</div>
<?php } ?>
</a>
</div>
<div id=”cbb-video-modal”></div>
In the first section we define a variable called $video_url whose value changes depending on whether it’s a YouTube URL or file attachment. If it’s a YouTube URL we also use the getYouTubeId function we defined in cbb-video-lightbox.php and store that in a variable.
Then we have the markup for the video thumbnail and title. If the type is “youtube”, we use YouTube’s automatically generated thumbnail (found at https://i1.ytimg.com/vi/[your_video_id_here]/mqdefault.jpg). Otherwise we use the one selected by the user in the module settings. You’ll also notice that we conditionally add the class “cbb-video-dark” to the div surrounding the title if the dark theme is selected.
frontend.css
Location: cbb-modules/cbb-video-lightbox/css/
Purpose: define all of the CSS for the front end of the module.
You can use frontend.css.php if you want to use the selected module settings to dynamically generate CSS, but this will probably be enough for less complex use cases.
frontend.js
Location: cbb-modules/cbb-video-lightbox/js/
Purpose: define all of the JavaScript for the front end of the module.
Important code snippet:
jQuery( function($){
$( ‘.cbb-video-link’ ).magnificPopup({
type: ‘iframe’,
mainClass: ‘mfp-fade’,
fixedContentPos: false
});
});
Here, we’ve written some jQuery to initialize a popup using the Magnific Popup plugin which is conveniently included with Beaver Builder (so no need to include an additional plugin). It selects the links with the class “.cbb-video-link” that we defined in frontend.php, and uses the link’s href property as the source for the popup video.
You can use frontend.js.php if you want access to the module settings in order to modify your javascript. In this case we don’t need to do anything as fancy as that.
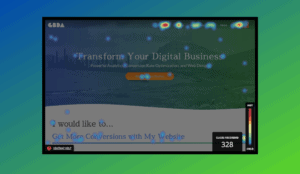
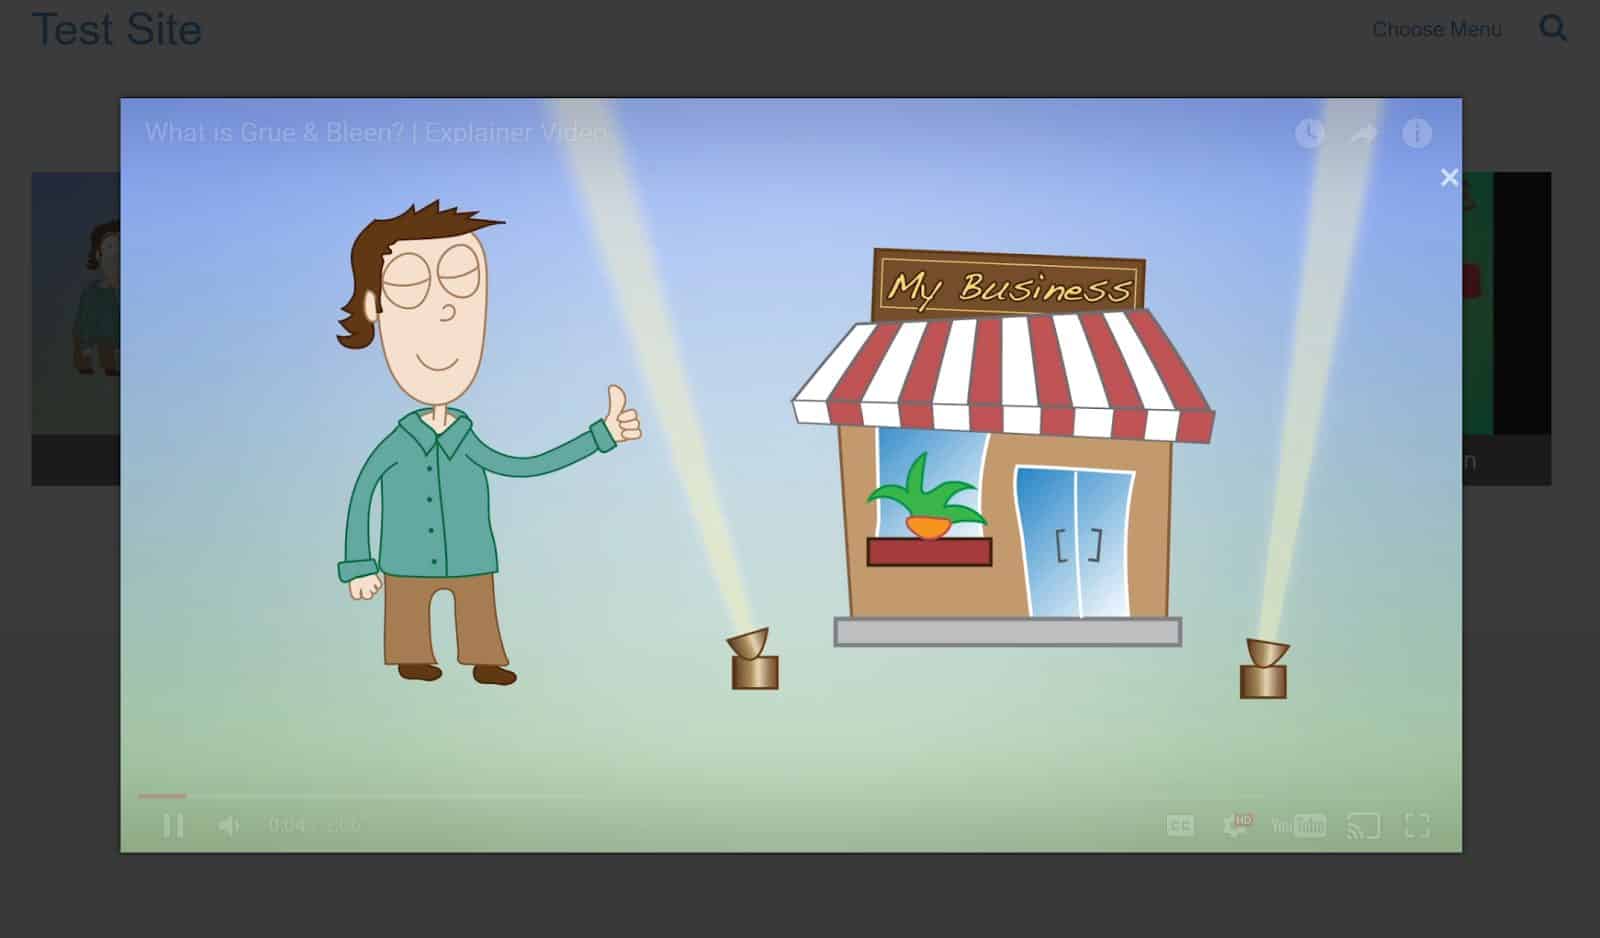
Here’s a glimpse of what the finished product looks like:
The End of a Journey

Although far from exhaustive, I hope that this brief overview of Beaver Builder module creation is helpful to you as you build your own modules. Feel free to use the Video Lightbox Module described in this post as a starting point (get it here), and consult the official Beaver Builder Documentation for help along the way. Also feel free to leave comments on this post below to ask specific questions or for any other concerns you may have. Happy coding!

About Great Big Digital
Achieve your website goals with customized data, intuitive UX, and intentional design.